
Well my lovely readers, thank you for sticking with me this year. Readership has gone up and it's all because of your help! I hope I've given you some new tips, tricks, and recipes that have excited you and surprised you! More importantly, I hope you've all surprised yourselves in the kitchen this year; pushed your culinary skills to their limits! Happy New Year, dear readers! I'll see you all in 2014!
Now go get yourself a glass of champagne and pop in a few pomegranate seeds...it's festive (just ask my mom).
Tuesday, December 31, 2013
Monday, December 30, 2013
5, 4, 3, 2...Almost the New Year!
Happy Monday everyone! It feels like it's been forever since we last spoke, doesn't it? Things have been busy in the kitchen, between preparing for brunch with my in-laws, in which the star was a cookie plate and nutella buns (pictures to come tonight I hope, to making lots and lots of my famous brownies...who has time to rest? At any rate, I haven't forgotten about you and the need to deliver fabulous desserts to ring in the New Year. Geez, it sure seems like we entertain a lot, doesn't it? But fear not, for we can still make fabulous goodies on time and the supermarkets are still open! Phew, what a relief! So here we go, let's hurry up and bake so we can be the talk of the town!
If you're ready to be daring...
Cream Puffs with Chocolate Sauce
Elizabeth Katz
Ingredients
Directions
Bomboloni with Chocolate Espresso, Whiskey Caramel, and Clementine Sauces
Gourmet Live, Nov 2011
Ingredients
Happy baking!
If you're ready to be daring...
Cream Puffs with Chocolate Sauce
Elizabeth Katz
Ingredients
- 1/2 cup milk
- 1/2 cup water
- 9 tablespoons unsalted butter
- 1/2 teaspoon salt
- 1 cup all-purpose flour
- 3 large eggs
- 2 1/4 cups heavy cream
- 1/4 cup confectioners' sugar
- 1 1/2 teaspoons pure vanilla extract
- 6 ounces bittersweet chocolate, chopped
Directions
- Preheat the oven to 400°. Line 2 large baking sheets with parchment paper.
- In a large saucepan, bring the milk, water, 1 stick of the butter and the salt to a boil over high heat. Add the flour and remove from the heat. Stir until the dough forms a shiny mass. Using a mixer, beat the dough at low speed for 2 to 3 minutes, just until slightly cooled. Increase the speed to medium and beat in the eggs, one at a time, beating well between additions; be sure to scrape down the saucepan.
- Transfer the dough to a pastry bag fitted with a 3/4-inch plain tip. Pipe twelve 1 1/2 inch mounds onto each sheet. Using a moistened finger, round the tops of the dough. Bake for about 25 minutes, until the puffs are golden, shifting the sheets halfway through.
- Poke a 1/4-inch-deep hole into the side of each puff and return them to the oven. Turn off the oven, leave the door ajar and let the puffs cool and dry out for 2 hours.
- Meanwhile, in a bowl, using a mixer, beat 1 1/2 cups of the cream with the confectioners' sugar until firm. Beat in the vanilla extract.
- Cut off the top third of each puff and scoop out the soft dough in the center. Spoon the cream into the puffs, replace the tops and stack them on a plate. Chill for 10 minutes.
- In a small saucepan, bring the remaining 3/4 cup of heavy cream just to a boil. Remove from the heat. Add the chocolate and the remaining 1 tablespoon of butter and let stand just until the chocolate is melted. Whisk until smooth. Drizzle some of the chocolate sauce over the puffs and serve, passing the remaining sauce on the side.
Bomboloni with Chocolate Espresso, Whiskey Caramel, and Clementine Sauces
Gourmet Live, Nov 2011
Ingredients
- 3/4 teaspoon active dry yeast (from a 1/4-ounce package)
- 6 tablespoons warm whole milk (105-115°F)
- 1 cup plus 2 tablespoons all-purpose flour, plus more for dusting
- 1 large egg
- 1 1/2 tablespoons unsalted butter, softened
- 1 1/2 tablespoons sugar
- 1/2 teaspoon vanilla extract
- 1/4 teaspoon ground cinnamon
- 1/4 teaspoon salt
- About 2 quarts vegetable oil for frying
Make Dough:
- Stir together yeast and milk in bowl of mixer and let stand until it appears creamy, about 5 minutes. (If mixture doesn't appear creamy, start over with new yeast.)
- Mix in 1/2 cup flour at low speed. Cover bowl with plastic wrap and a kitchen towel and let rise in a draft-free place at warm room temperature until doubled, about 1 hour.
- Mix in egg, butter, sugar, vanilla, cinnamon, salt, and remaining 1/2 cup plus 2 tablespoons flour at low speed until combined. Increase speed to medium and beat dough until smooth and elastic, 5 to 7 minutes.
- Scrape dough into center of bowl and dust with additional flour. Cover bowl with plastic wrap and a kitchen towel and let dough rise in a draft-free place at warm room temperature until doubled, about 1 hour.
- Punch down dough and turn out onto a well-floured surface (dough will be very sticky.) Cut into 16 equal pieces and form into balls with floured hands. Transfer to a lightly floured baking sheet 1 inch apart.
Fry Bomboloni:
- Heat 2 1/2 inches oil to 350°F in a 4- to 5-quart pot over medium heat. Fry bomboloni in batches of 4, turning frequently with tongs for even browning, until puffed and golden brown, 2 to 3 minutes per batch.
- Transfer with a slotted spoon to towels to drain. Return oil to 350°F between batches.
- Cool bomboloni to warm and serve with sauces.
Cooks' Notes:
- Bomboloni can be formed, but not fried, 1 day ahead and chilled on a rimmed sheet pan, loosely covered with plastic wrap. Let stand at room temperature 20 minutes before frying.
- Although bomboloni are best freshly made, they can be fried a day ahead, cooled, and kept covered with plastic wrap at room temperature. Reheat, uncovered, in a sheet pan on a rack in a 300°F oven until warm, 4 to 5 minutes.
- Oil can be cooled to warm, strained through a paper towel–lined sieve, and reused once more.
Happy baking!
Tuesday, December 24, 2013
Christmas Eve-Day...Bake While the Stores are Still Open!
Happy Tuesday everyone! It's Christmas Eve-Day - is that a holiday? I'm not sure. While my own baking continues (I started Saturday night), you may still need one or two last minute ideas to contribute to the Christmas table. So without much fanfare (because who are we kidding, you really need to bust a move at this point), here are a few last minute recipes!
Thumbprint Cookies with Toasted Nuts and Whole Grains
Adapted from Tartine Book No. 3 by Chad Robertson for NYT
Ingredients
Swedish Dream Cookies
Saveur
Ingredients
Happy baking everyone and Merry Christmas! My pictures will come soon, and I hope you will share some of your own! Enjoy the time with friends and family!
Thumbprint Cookies with Toasted Nuts and Whole Grains
Adapted from Tartine Book No. 3 by Chad Robertson for NYT
Ingredients
- 1 1/2 cups pecans (6 1/2 ounces)
- 1 1/2 cups dark rye flour (6 1/2 ounces)
- 2/3 cup granulated sugar (4 1/2 ounces)
- 1/4 teaspoon fine sea salt
- 9 tablespoons unsalted butter, cut into pieces and softened at room temperature
- Jam, marmalade or lemon curd, for filling
- Heat oven to 350 degrees. Spread pecans on a baking sheet and toast until golden, 8 to 10 minutes. Remove from oven and let cool completely. Line two baking sheets with parchment paper or nonstick baking mats.
- In a food processor fitted with the metal blade, combine nuts, flour, sugar and salt and pulse until very finely ground, about 1 minute. Transfer to a large bowl and add butter by hand, a few pieces at a time, massaging butter into dry ingredients until it forms a shaggy dough. (If dough seems dry and is not coming together, work in water, 1 tablespoon at a time, until it does.)
- Turn dough out onto a lightly floured work surface and bring it together with your hands. Have a bowl of warm water at hand nearby. Divide dough in half, dip your hands in water and roll each lump into a thin log, about 15 inches long and 1/2 inch across. Cut each log into 1/2-inch slices and roll each slice into a ball, dipping hands in water as needed to prevent dough from sticking. Transfer balls to prepared pans, spacing them about 1/2 inch apart.
- Using your pinkie or the rounded end of a small wooden spoon, press into the top of each ball to make a well. As you press, use your other hand to hold the ball and shape it around the finger or handle into a small, flat-bottomed cup. The goal is to give the dough an even thickness throughout the cookie. Place pans in refrigerator and chill cookies for at least 30 minutes or up to 12 hours.
- Bake cookies for 10 to 12 minutes, rotating baking sheets halfway through to ensure even browning, until cookies are golden around the edges.
- Remove baking sheets from oven and let cookies cool completely. (The recipe can be made up to this point 3 days ahead and stored in an airtight container.) When ready to serve (up to 8 hours ahead of time), use a pastry bag or a small spoon to fill each well with jam, marmalade or preserves.
Swedish Dream Cookies
Saveur
Ingredients
- 1 2/3 cups flour
- 1 tsp. baking soda
- 8 tbsp. unsalted butter, softened
- 1 1/4 cups sugar
- 1 tbsp. vanilla sugar
- 1/3 cup corn oil
- Heat oven to 300°. In a small bowl, whisk together flour and baking soda; set aside. In a large bowl and using a handheld mixer on medium speed, beat butter and sugars until pale and fluffy, 1–2 minutes. Add oil and mix until smooth. Add dry ingredients and stir until just combined.
- Using a tablespoon-size measuring spoon, divide dough into about 40 portions. Using your hands, shape dough portions into balls. Place dough balls 2" apart on baking sheets lined with parchment paper. Bake 1 sheet at a time until cookies crack on top and are just set, 25–30 minutes. Transfer to a wire rack and let cool before serving.
Happy baking everyone and Merry Christmas! My pictures will come soon, and I hope you will share some of your own! Enjoy the time with friends and family!
Monday, December 23, 2013
Food, Festivities, Fun...and a Little Bit of Drinking
Happy Monday all! Christmas is almost upon us and while your food menu might be ready, your drink menu is equally as important! All that family, all that noise...those kids...the pets...the screaming...where's my cocktail? Tonight's recipes are here to amaze and thrill your guests; happy guests = easier baking. Drink up.
The Savoy Daisy
Erik Lorincz
Ingredients
Ingredients
The Savoy Daisy
Erik Lorincz
Ingredients
- Ice
- 2 ounces ruby port
- 1/4 ounce Bacardi 8-year aged rum
- 1 ounce Diplomatico Reserva Exclusiva rum
- 2 tablespoons freshly squeezed lemon juice
- 1/2 teaspoon muscovado sugar
- 1/2 tablespoon grenadine
- 1 orange twist
Directions
Fill a cocktail shaker with ice. Add all of the ingredients except the orange twist and shake vigorously. Strain into a chilled martini glass and garnish with the twist.
Hot Peppermint Flip
Gourmet, February 1986
Ingredients
- 1 large egg
- 2/3 cup heavy cream
- 1 tablespoon sugar
- 1/2 cup peppermint schnapps
- 1/2 cup cognac
- 3 cups hot espresso
- 3 peppermint sticks, halved, for garnish
Directions
In a blender, combine the egg, the cream, the sugar, the schnapps, and the cognac and blend the mixture at high speed for 10 seconds. With the motor running, add the espresso in a stream and blend the mixture until it is frothy. Divide the mixture among 6 heated coffee cups and garnish each drink with one of the peppermint sticks.
Philadelphia Fish House Punch
Bon Appetit
- 2 cups cups sliced fresh (or frozen, thawed) peaches
- 12 sprigs thyme
- 1¼ cups cups sugar
- 1 liter (4¼ cups) Jamaican Gold rum (such as Appleton Estate)
- 2 cups cups Cognac
- 1½ cups cups fresh lemon juice
- 1 cup cup peach liqueur (such as Bols)
Directions
Do ahead:
- Arrange peaches and thyme sprigs along the bottom of Bundt pan. Fill pan with cold water and freeze to make an ice ring. Combine sugar and 1¼ cups water in a jar; cover and shake to dissolve to make simple syrup. Ice ring and simple syrup can be made 2 weeks ahead.
- Keep ice ring frozen. Chill simple syrup. Pour simple syrup into a large wide container or a punch bowl. Add rum, Cognac, lemon juice, and peach liqueur. Cover and chill for at least 2 hours or overnight. Add 6 cups cold water to punch; stir gently to blend. Remove ice ring from Bundt pan and float, rounded side up, in punch. Ladle into glasses filled with ice.
Friday, December 20, 2013
Not Your Typical Holiday Dessert
Happy Friday all! I'm sneakily doing this in a quiet moment in the day, as the hustle and bustle continues around me. Let's talk about the desserts you make when you're SICK of making cookies and gingerbread; when you're turned off by the minty treat from one too many peppermint mochas! These desserts are made to bring the Christmas spirit to your table, without the usual flavor combinations. Grab a fork; yum, yum.
For your inner Brit...
Sticky Toffee Pudding
Gourmet March 2005
Ingredients
Lemon, Poppy and Chevre Cheesecakes with Rhubarb
Laura Sawicki
Ingredients
Cheescakes:
Directions
Brown Butter Fig Tartlets
Food Network Magazine
Ingredients
For the Tartlets:
For your inner Brit...
Sticky Toffee Pudding
Gourmet March 2005
Ingredients
- 2 sticks (1 cup) unsalted butter, softened, plus additional for greasing pan
- 1 cup self-rising cake flour plus additional for flouring pan
- 1 cup pitted dates (5 oz), finely chopped
- 1 1/4 cups packed dark brown sugar
- 1 large egg
- Put oven rack in middle position and preheat oven to 350°F. Butter and flour an 8- by 2-inch round cake pan.
- Simmer dates in 1 cup water in a 1-quart heavy saucepan, covered, until soft, about 5 minutes. Let stand, covered, off heat 5 minutes.
- Beat together 1 stick butter and 1/4 cup brown sugar in a large bowl with an electric mixer at medium-high speed until light and fluffy, about 4 minutes. Beat in egg until combined. Add flour and 1/8 teaspoon salt and mix at low speed until just combined. Add dates and mix until just combined well.
- Pour batter into pan and bake until a wooden pick or skewer inserted in center comes out clean, about 30 minutes.
- Meanwhile, melt remaining stick butter in a 2-quart heavy saucepan over moderate heat and stir in remaining cup brown sugar, 1/3 cup water, and a pinch of salt. Boil over moderately high heat, uncovered, stirring occasionally, until sugar is dissolved and sauce is reduced to about 1 1/4 cups, 2 to 8 minutes. Remove from heat and cover.
- Transfer pudding in pan to a rack and poke all over at 1-inch intervals with a chopstick. Gradually pour half of warm sauce evenly over hot pudding. Let stand until almost all of sauce is absorbed, about 20 minutes.
- Run a thin knife around edge of pan. Invert a plate over pudding and invert pudding onto plate. Pour remaining warm sauce over pudding and serve immediately.
Lemon, Poppy and Chevre Cheesecakes with Rhubarb
Laura Sawicki
Ingredients
Cheescakes:
- 1/4 cup plus 2 tablespoons sugar, plus more for coating the ramekins
- 8 ounces cream cheese, at room temperature
- 6 ounces soft fresh goat cheese, at room temperature
- 2 teaspoons finely grated lemon zest
- 1 teaspoon fresh lemon juice
- 1/2 teaspoon vanilla bean paste or 1 teaspoon pure vanilla extract
- 1/4 teaspoon salt
- 1 cup sour cream
- 3 large eggs, at room temperature
- 1 tablespoon poppy seeds
- 1 pound rhubarb, cut into 1/2-inch dice
- 1/2 cup sugar
- 1/2 vanilla bean, split
- Pinch of salt
- 1 teaspoon finely grated orange zest
- 1 teaspoon finely grated fresh ginger
- 1 tablespoon St.-Germain liqueur or elderflower cordial
- 1 pint raspberries
- 5 tablespoons unsalted butter, at room temperature
- 1/4 cup plus 2 tablespoons sugar
- 1/2 teaspoon fresh lemon juice
- 1 cup graham cracker crumbs (from 1 sleeve)
- 1 teaspoon all-purpose flour
- 1/2 teaspoon salt
- 1/4 teaspoon cinnamon
- MAKE THE CHEESECAKES Preheat the oven to 325°. Spray eight 4- to 6-ounce ramekins with vegetable oil spray and dust with sugar; tap out the excess. Set the ramekins in a large roasting pan.
- In a large bowl, using an electric mixer, beat the cream cheese, goat cheese and the 1/4 cup plus 2 tablespoons of sugar until smooth.
- Beat in the zest, lemon juice, vanilla and salt. Beat in the sour cream. Add the eggs, one at a time, beating well between additions. Beat in the poppy seeds.
- Divide the mixture between the ramekins and set the pan in the oven. Carefully add enough hot water to the pan to reach halfway up the sides of the ramekins. Bake for 20 to 25 minutes, until the cheesecakes are just set. Remove from the oven and let cool in the water bath for 1 hour. Refrigerate the cheesecakes until cooled completely, 3 hours.
- MEANWHILE, MAKE THE COMPOTE In a medium saucepan, let the rhubarb, sugar, vanilla bean and salt stand until slightly juicy, 20 minutes.
- Add the zest and ginger and cook over moderate heat, stirring occasionally, until the rhubarb is tender, about 15 minutes.
- Add the St.-Germain and raspberries and cook until slightly thickened, about 5 minutes. Transfer the compote to a bowl and let cool. Discard the vanilla bean.
- MAKE THE STREUSEL Preheat the oven to 350°. Line a baking sheet with parchment paper. In a bowl, using an electric mixer, beat the butter, sugar and lemon juice until fluffy.
- Beat in the graham cracker crumbs, flour, salt and cinnamon.
- Scatter the streusel onto the baking sheet and freeze for 10 minutes.
- Bake the streusel for about 20 minutes, until fragrant, golden and firm. Let cool completely, then crumble the streusel.
- Run a thin knife around the cheesecakes and invert them onto plates. Spoon the compote on top and garnish with the streusel crumbs. Serve right away.
Brown Butter Fig Tartlets
Food Network Magazine
Ingredients
For the Tartlets:
- 12 tablespoons unsalted butter
- 1 1/2 cups all-purpose flour, plus more for dusting
- 3 tablespoons granulated sugar
- 1/3 cup confectioners' sugar
- 1/2 teaspoon salt
- 3/4 cup fig jam
- 1/2 cup bourbon
- 1/2 cup granulated sugar
- 1 vanilla bean, split lengthwise and seeds scraped out
- 1 1/4 cups dried black figs, stems removed, halved
- Creme fraiche, for serving
Directions
- Make the tartlets: Preheat the oven to 350. Melt the butter in a saucepan over low heat and cook until it browns and smells nutty, then let cool.
- Stir in the flour, both sugars and the salt with a wooden spoon. Sprinkle with 1 tablespoon water, if necessary, to help the dough clump together. Turn out onto a floured surface and knead three or four times, or just until the dough comes together.
- Scoop 1/4 cup dough into each of 6 nonstick muffin-pan cups. Press the dough down in the middle and slightly up along the sides to make a cup shape. Chill until firm, about 30 minutes.
- Place 1 heaping tablespoon fig jam in the center of each tartlet and bake until golden, 35 to 40 minutes. Cool slightly, then remove from the pan.
- Meanwhile, make the topping: Heat the bourbon, sugar, 1/2 cup water and the vanilla pod and seeds in a medium saucepan over medium heat.
- Add the figs and poach until they are plump and the liquid is syrupy, about 15 minutes.
- Serve the tartlets with the figs, their sauce and a dollop of creme fraiche.
Happy baking!
Tuesday, December 17, 2013
Is Frying Bad if it's with Quinoa?!
We've made it to Tuesday and what a delightful day it was (still is for some of you?). This weekend my husband and I finally tried a recipe I've been waiting to make! I am a biiiiig fan of certain gloriously fried, unhealthy-but-oh-so-delicious foods, such as hush puppies, and I recently came across a recipe for quinoa hush puppies! I just had to try these bad boys, after my most recent frying experience (mini donuts) went so gloriously well! So I hope your mouth is watering and the wheels are turning as you think of the accompaniments you'll have with these little gems. I served them to my husband with a steak (thank you meat sales at Whole Foods!) with herb butter. Get out your skimmer and let's get frying!
Market Table's Quinoa Hush Puppies with Chile Aioli
Melissa Clark
Ingredients
Hush Puppies:
Market Table's Quinoa Hush Puppies with Chile Aioli
Melissa Clark
Ingredients
Hush Puppies:
- 170 grams quinoa (1 cup)
- 1 gram salt (1/4 teaspoon), plus more for sprinkling
- 1/3 cup finely chopped yellow onion
- 1 small clove garlic, finely chopped
- 90 grams all-purpose flour (3/4 cup)
- 2 grams baking powder (1/2 teaspoon)
- 1 large egg
- 1/4 cup buttermilk
- Finely grated zest of 1/2 a lemon
- 2 tablespoons chopped parsley
- 2 tablespoons chopped drained capers
- Safflower or peanut oil, for frying

- 2 grams chile powder (1/2 teaspoon)
- 1 pinch of cayenne pepper
- 1/2 cup mayonnaise
- 1 anchovy filet
- 1 small clove garlic, minced
- Place the quinoa in a large sieve. Add cold water and stir the quinoa with your hand or a wooden spoon. Let the water drain. Repeat at least once. Place the drained quinoa in a medium-size pot. Add 1 cup of water and 1/4 teaspoon salt. Bring the quinoa and water to a boil with lid on, then turn heat down to a simmer. Simmer quinoa for 12 minutes. Remove pot from the heat and allow quinoa to sit five minutes with the lid still on. Fluff quinoa with a fork and spread out evenly on a small rimmed pan to cool.
- In a bowl, combine the cooled quinoa with the remaining hush puppies ingredients except for the frying oil. Mix until the batter comes together.
- Heat a pot with 2 inches of oil. It is hot enough when a pinch of batter thrown in sizzles (350 degrees). Carefully spoon heaping tablespoons of batter into the oil, about 5 at a time, and fry 2 to 3 minutes, flipping occasionally with a slotted spoon or wire spider, until crisp and golden brown. Place the fried hush puppies on a tray lined with paper towels and immediately sprinkle with salt. Repeat until all the hush puppies are fried.
- To make the chile aioli, combine the spices, mayonnaise, anchovy and garlic in the bowl of a blender. Blend on high speed until smooth. Serve with the fried hush puppies.
Monday, December 16, 2013
Holiday Cupcakes, Ho Ho Ho!
Happy Monday all! It's already pretty late; chili's on the stove; The Sing Off is on my TV...and I've got pictures (and cupcakes) ready to rock! These special red velvet cupcakes with perfectly sweet-but-not-overpoweringly-so cream cheese frosting are going to a lot of co-workers who could use a holiday season pick me up!


Now for your tip of the day: Where to get those cool little cupcake liners/boxes in a hurry? The gift giving season is upon us (or passed, depending on if you celebrated the absurdly early Hannukah this year, as I did) and sometimes we don't have time to order online (or, do you really wanna spend $30 on 2 day shipping when the product only costs $10?)! I've got a few spots for you to check out for specialty cake accessories to save you time this year - but next year, order online, in September!
Local supermarket: They've always got the basics. Lately they've had some interesting new cupcake liners and disposable foil tins with plastic lids. Just beware, their stuff is often expensive!
Target: You're probably saying, duuuuuh. But have you looked in their holiday section? There are so many new, cute cookie cutters/cupcake liners/accessories.
Michaels: This store has it all! They usually have 2-3 aisles full of boxes, liners, pastry equipment, etc. Try here first - you won't be sorry.
See you tomorrow!
Friday, December 13, 2013
Friday Night Cookie Factory!
Happy Friday everyone! If you're exhausted from the pre-Christmas madness (or you're like me and getting home from work means pushing your way through crowds of tourists taking pictures of rooftops), you're going to need a break. Might I suggest having a cookie bonanza in the comfort of your own home? I am salivating just thinking about eating soft, chewy cookies, crumbs littering the corners of my lips. Yum. Grab a glass of wine (if you are of age!) and try one of these outrageously delicious cookie recipes.
Pucker up, baby!
Lemony Slice-and-Bakes
Gina Marie Miraglia Eriquez
Ingredients
Cookies
Pucker up, baby!
Lemony Slice-and-Bakes
Gina Marie Miraglia Eriquez
Ingredients
Cookies
- 2 1/2 cups all-purpose flour
- 1/2 teaspoons kosher salt
- 1 cup (2 sticks) unsalted butter, room temperature
- 3/4 cup sugar
- 2 tablespoons finely grated lemon zest
- 1 teaspoon vanilla extract
- 4 large egg yolks
- 1 1/4 cups powdered sugar
- 2 tablespoons (or more) fresh lemon juice
- Food coloring (optional)
- Sanding sugar (optional)
For cookies
- Whisk flour and salt in a medium bowl. Using an electric mixer on medium-high speed, beat butter, sugar, lemon zest, and vanilla in a large bowl, occasionally scraping down sides, until light and fluffy, about 3 minutes. Add egg yolks; beat just to blend. Reduce speed to low; add flour mixture and beat, occasionally scraping down sides, just to blend. Divide dough in half; roll each half into a 10"-long log about 1 3/4" in diameter. Wrap in plastic and chill until firm, about 1 hour. DO AHEAD: Can be made 2 days ahead. Keep chilled.
- Arrange racks in lower and upper thirds of oven; preheat to 350°F. Line 2 baking sheets with parchment paper. Unwrap 1 dough log. Using a sharp, lightly floured knife, cut log into 1/4"-thick rounds. Transfer to prepared sheets, spacing 1" apart.
- Bake until cookies are firm and golden brown around edges, 16-18 minutes. Let cool for 1 minute, then transfer to wire racks and let cool completely. Repeat with remaining dough log, using cooled baking sheets and new parchment paper.
For icing
- Whisk sugar and 2 tablespoons juice in a small bowl, adding more juice by 1/2-teaspoonfuls if too thick. Add coloring, if desired. Spread or drizzle icing over cookies. Decorate as desired. Let stand until icing sets, about 10 minutes.
Minimalist eater?
Cinnamon Sour Cream Cookies
Florence Fabricant
Ingredients
- 2 1/2 cups flour
- 1 teaspoon baking powder
- 1/4 teaspoon salt
- 1/2 tablespoon ground cinnamon
- 1/2 cup soft butter, plus a little for greasing pans
- 1 cup packed light brown sugar
- 1 egg
- 1/2 cup sour cream
- 1/2 teaspoon baking soda
Directions
- Sift the flour, baking powder, salt and cinnamon together and set aside.
- Beat the butter with the sugar until well blended and creamy. Beat in the egg.
- Mix the sour cream and baking soda together and add to the butter mixture. Add the dry ingredients and beat well to make a soft dough. It will be sticky, so cover and chill the dough for about 30 minutes until it is firm enough to handle. If the kitchen is hot you may need to chill the dough a little longer.
- Lightly grease baking sheets. Preheat oven to 375 degrees.
- Take walnut-size pieces of the dough and roll into balls. Arrange on the baking sheets about two inches apart to allow for spreading. Flatten the balls with the tines of a fork. Bake 10 to 15 minutes until the cookies are golden brown but still slightly soft in the center. Allow to cool for a couple of minutes on the pans, then transfer them to racks to cool completely.
Jackpot!
Salt Caramel Millionaire's Shortbread
Adapted from The Picnic Cookbook by Annie Bell
Ingredients
- FOR THE SHORTBREAD
- 16 tablespoons (2 sticks) cold unsalted butter, cut into small cubes
- 1/2 cup superfine sugar
- 1 1/2 cups plus 2 tablespoons flour
- 1 teaspoon vanilla extract
- FOR THE TOPPING
- 7 tablespoons (from 1 stick) unsalted butter
- 1/3 cup superfine sugar
- 1 tablespoon Lyle's Golden Syrup (may substitute dark corn syrup)
- 1 cup plus 2 tablespoons homemade or store-bought dulce de leche
- 1/8 teaspoon plus 1/4 teaspoon fine sea salt
- 7 ounces bittersweet chocolate chips (60 to 70 percent cacao)
- 2 ounces white chocolate, broken into pieces
- For the shortbread: Grease a 9-inch square baking pan with cooking oil spray, then line with parchment paper so the paper hangs over two sides (for easy lifting).
- Combine the butter, sugar, flour and vanilla extract in a food processor. Pulse to form a dough that holds together. Transfer to the pan and press the dough into the bottom; feel free to lay a piece of plastic wrap over the dough for this step. Use a fork to prick the dough. Refrigerate for at least 1 hour and up to overnight.
- Preheat the oven to 300 degrees. Bake the shortbread dough, straight from the refrigerator, for 40 to 45 minutes; it should just be starting to brown. Cool in the pan.
- Meanwhile, make the topping: Combine the butter, sugar, syrup, dulce de leche and salt in a small nonstick saucepan over medium heat. stirring until the mixture is melted and blended. Reduce the heat to low; cook for 8 or 9 minutes, stirring often, to form a caramel; when it’s ready, it will be darkened in color with a thinner, pourable consistency.
- Pour the caramel directly over the center of the shortbread base; it will spread by itself. You don’t want to work it into the corners. Leave it undisturbed for at least 1 hour to set.
- Heat a few inches of water in a saucepan over medium heat. Place the bittersweet chocolate chips in a bowl that fits over the saucepan. Once the chocolate has melted and can be stirred smooth, pour it over the set caramel. Use a bamboo skewer or cake tester to create swirl patterns in the chocolate.
- Repeat the melting and swirling with the white chocolate. If either chocolate begins to firm up prematurely, transfer to a low-temperature oven just until softened.
- Cool until the chocolate is set yet slightly soft. Use the parchment paper to lift and transfer the shortbread to a cutting board. A serrated knife works best for cutting into 16 or 32 squares. Allow the chocolate to set completely before serving or storing.
Happy baking!
Wednesday, December 11, 2013
All I Want for Christmas is CHOCOLATE!
Hello everyone, we've made it to another Wednesday. Perhaps you're halfway through your week's workout schedule; maybe you've just finished a really intense cardio class. SO, what better time than now to talk about making this holiday season a chocolatey one! Today's recipes are rich and sinful, but I think Santa will still approve. Grab a glass of milk and enjoy!
...a combo of dark and light.
Chocolate Cake with Caramel-Milk Chocolate Frosting
Bon Appetit April 2003
Ingredients
Cake
Praline and chocolate curls:
...a combo of dark and light.
Chocolate Cake with Caramel-Milk Chocolate Frosting
Bon Appetit April 2003
Ingredients
Cake
- Nonstick vegetable oil spray
- 2 cups sifted cake flour (sifted, then measured)
- 1 cup unsweetened cocoa powder (preferably Dutch-process)
- 1 1/4 teaspoons baking soda
- 3/4 teaspoon salt
- 1/2 teaspoon baking powder
- 1 1/2 cups (packed) golden brown sugar
- 1 cup plus 2 tablespoons (2 1/2 sticks) unsalted butter, room temperature
- 3 large eggs
- 1 tablespoon vanilla extract
- 1 cup plus 2 tablespoons buttermilk
- 1/2 cup lukewarm water
- 1 cup semisweet chocolate chips
- 24 ounces imported milk chocolate (such as Lindt), finely chopped
- 3 ounces bittersweet (not unsweetened) or semisweet chocolate, finely chopped
- 1 1/2 cups sugar
- 1/2 cup water
- 2 1/4 cups whipping cream
For cake
- Preheat oven to 350°F. Spray three 9-inch-diameter cake pans with 1 1/2-inch-high sides with nonstick spray. Line bottom of pans with parchment paper. Whisk flour and next 4 ingredients in medium bowl. Using electric mixer, beat brown sugar and butter in large bowl until fluffy, about 2 minutes. Add eggs 1 at a time, beating well after each addition. Beat in vanilla. Beat in dry ingredients in 3 additions alternately with buttermilk in 2 additions. Beat in 1/2 cup lukewarm water. Stir in chocolate chips.
- Divide batter among prepared pans (about 2 1/3 cups for each). Smooth tops. Bake cakes until tester inserted into center of cakes comes out clean, about 22 minutes. Cool completely in pans on racks. Invert cakes onto 9-inch-diameter cardboard rounds or tart pan bottoms (cakes are delicate). Peel off parchment.
- Combine milk chocolate and bittersweet chocolate in large bowl. Stir sugar and 1/2 cup water in medium saucepan over medium heat until sugar dissolves. Boil without stirring until syrup is deep amber color, occasionally brushing down sides of pan with wet pastry brush and swirling pan, about 10 minutes. Carefully and slowly add whipping cream (mixture will bubble vigorously). Stir over low heat until any hard caramel bits dissolve and mixture is smooth. Pour caramel over chocolate; let stand 1 minute to allow chocolate to soften, then whisk until chocolate is melted and smooth. Chill chocolate-caramel frosting until completely cool, about 2 hours. Let stand 1 hour at room temperature before continuing.
- Using electric mixer, beat frosting just until color resembles milk chocolate and frosting is easily spreadable, about 1 minute (do not overbeat or frosting will become stiff and grainy). If necessary to correct graininess, set bowl with frosting over saucepan of simmering water for 10-second intervals, whisking just until frosting is smooth and spreadable.
- Place 1 cake layer on platter, flat side up. Spread 1 cup frosting evenly over top. Top with second cake layer, flat side up, pressing slightly to adhere. Spread 1 cup frosting over top. Top with third cake layer, rounded side up, pressing slightly. Spread remaining frosting over top and sides of cake, swirling decoratively. (Can be made 2 days ahead. Cover with cake dome and store at room temperature.)
...just. Give. Me. Chocolate.
Chocolate Ice Cream
Fergus and Margot Henderson
Ingredients
- 7 ounces dark chocolate (70% to 75% cacao), finely chopped
- 2 cups plus 2 tablespoons whole milk
- 1/3 cup unsweetened cocoa powder
- 6 large egg yolks
- 13 tablespoons sugar, divided
- 1/4 cup heavy whipping cream
Directions
- Place chocolate in a medium metal bowl. Set bowl over a saucepan of barely simmering water. Stir chocolate until melted and smooth. Set melted chocolate aside; let cool slightly.
- Whisk milk and cocoa powder in a medium heavy saucepan over medium heat until mixture begins to boil; set aside.
- Using an electric mixer, beat egg yolks and 7 tablespoons of sugar in another medium bowl until very thick ribbons form, about 2 minutes. Whisking constantly, gradually add hot milk mixture to egg yolk mixture. Return mixture to saucepan. Add melted chocolate and whisk to blend. Stir over low heat until slightly thickened and an instant-read thermometer registers 175° about 5 minutes. Transfer chocolate custard to a large bowl and place over another large bowl of ice water. Stir until chocolate custard is cool.
- Bring remaining 6 tablespoons sugar and 2 tablespoons water to a boil in a small heavy, deep saucepan over medium-high heat, stirring until sugar dissolves. Boil, occasionally swirling pan and brushing down sides with a wet pastry brush (do not stir), until a dark amber color forms, about 5 minutes. Gradually whisk in cream (mixture will bubble vigorously). Whisk caramel into chocolate custard. Strain into a large container; cover and chill for 2 days.
- Process custard in an ice cream machine according to manufacturer's instructions. Transfer to another container; freeze for 3 days before eating. DO AHEAD: Ice cream can be made 3 days ahead. Keep frozen.
Lizzy Bee's Note: Now you know how much I like to make ice cream lighter, but in this case, no. Let's just not. Just go all out.
...wait, WHITE chocolate? It's not technically even chocolate! Who cares, just go with it...
White Chocolate Espresso Torte with Hazelnut Praline
Dede Wilson
Ingredients
Praline and chocolate curls:
- 2/3 cup sugar
- 1/4 cup water
- 1 1/2 teaspoons instant espresso powder
- 1 cup hazelnuts, toasted , husked
- 1 6- to 8-ounce block high-quality white chocolate (1 to 1 1/2 inches thick; for chocolate curls)
- 12 ounces high-quality white chocolate (such as lindt or perugina), finely chopped
- 5 tablespoons water
- 2 cups chilled heavy whipping cream
- 2 1/2 teaspoons instant espresso powder soaking syrup and ganache
- 2/3 cup kahlúa or other coffee-flavored liqueur
- 4 teaspoons instant espresso powder
- 7 ounces bittersweet chocolate (do not exceed 61% cacao), chopped
- 2 tablespoons dark corn syrup
- 3/4 cup heavy whipping cream
- Nonstick vegetable oil spray
- 4 large eggs, room temperature
- 2/3 cup sugar
- 3 1/2 teaspoons instant espresso powder, divided
- 1 teaspoon vanilla extract
- 1/8 teaspoon salt
- 1 cup sifted cake flour (sifted, then measured)
- 2 tablespoons (1/4 stick) unsalted butter, melted, cooled
- 6 tablespoons powdered sugar, divided
Blocks of white chocolate are often available at Whole Foods markets and can be ordered online from beryls.com
Directions
For praline and chocolate curls:
- Place sheet of foil on work surface. Bring sugar and 1/4 cup water to boil in heavy medium saucepan over medium-high heat, stirring until sugar dissolves. Boil without stirring until syrup is deep amber, brushing down sides of pan with wet pastry brush and swirling occasionally, 7 to 8 minutes. Mix in espresso powder, then nuts. Scrape mixture onto foil; quickly spread out. Cool completely. Chop praline into small pieces.
- Microwave white chocolate block at 50 percent power in 10-second intervals until chocolate feels just slightly warm and is just beginning to soften (if too soft, let stand until firm enough to shave). Using vegetable peeler, shave 1- to 1 1/2-inch-wide ribbon, about 4 to 5 inches long, from block. Gently roll ribbon into loose curl (cylinder). Repeat, making 20 to 24 curls. DO AHEAD: Praline and chocolate curls can be made 2 days ahead. Chill separately in airtight containers.
- Stir chocolate and 5 tablespoons water in metal bowl set over saucepan of barely simmering water until chocolate is smooth. Remove bowl from over water. Cool chocolate to lukewarm, stirring occasionally. Using electric mixer, beat cream in large bowl until soft peaks form. Gradually pour lukewarm chocolate over cream, folding to blend well. Transfer 2 1/2 cups mousse to another medium bowl; gently fold in espresso powder. Cover and chill both bowls of mousse until firm, at least 6 hours. DO AHEAD: Can be made 1 day ahead. Keep chilled.
- Stir liqueur and espresso powder in small bowl until espresso dissolves. Place chocolate and corn syrup in medium bowl. Bring cream to boil in small saucepan; pour over chocolate and corn syrup. Stir until melted and smooth. DO AHEAD: soaking syrup and ganache can be made 1 day ahead. Cover separately and store at room temperature.
- Preheat oven to 350°F. Coat 15 x 10-inch sheet of parchment paper with nonstick spray. Line 15x10x1-inch baking sheet with prepared parchment (sides of baking sheet should not be coated).
- Combine eggs, sugar, 2 teaspoons espresso powder, vanilla, and salt in large bowl. Using electric mixer, beat until egg mixture is thick and fluffy and falls in ribbons when beater is lifted, 6 to 7 minutes. Sift flour over in 3 additions, folding gently just to incorporate after each addition. Transfer 1 cup batter to small bowl; fold in butter. Fold batter from small bowl back into batter in large bowl just until combined; spread evenly on baking sheet.
- Bake cake until tester inserted into center comes out clean and cake begins to pull away from pan, about 18 minutes. Cool cake in pan on rack 30 minutes.
- Sift 2 tablespoons powdered sugar over cake. Cut around pan sides. Slide spatula under parchment to loosen from pan and invert cake onto work surface. Peel off parchment. Cut cake crosswise into 4 rectangles, each about 10 x 3 1/2 inches.
- Place 1 cake rectangle on platter. Brush 2 tablespoons soaking syrup over. Spread 3 tablespoons ganache over, then 1/3 of espresso mousse (about 3/4 cup). Repeat 2 more times with cake, syrup, ganache, and mousse. Top with fourth cake layer; press lightly to adhere. Spread 2/3 cup plain mousse thinly over top and sides of torte to seal, then spread remaining mousse over top and sides. DO AHEAD: can be made 1 day ahead. Tent loosely with foil and chill.
- Before serving, press praline pieces into mousse on all sides of torte. Mound white chocolate curls on top. Mix 4 tablespoons powdered sugar and 1 1/2 teaspoons espresso powder in small bowl. Sift over top of torte.
Happy baking!
Tuesday, December 10, 2013
Hannukah Delights AND DIY Gifts
Happy Tuesday all! I've got delightful pictures to share from another deliciously successful (and oily) Hannukah dinner. PLUS, I've got some DIY holiday gifts you might want to try for your friends and family! First, some pictures! (I'm a visual learner, I like to see what's going on!)
 |
| Hors d'oeuvres anyone? Garlicky sausage wrapped in puff dough and topped with a chutney-mustard blend. |
 |
| Yummy chicken marinated overnight in an apricot preserve blend with herbs and spices. |
 |
| The main event! A New York Times latke recipe (gotta mix it up!) AND a sweet potato latke recipe, continually perfected year after year. |
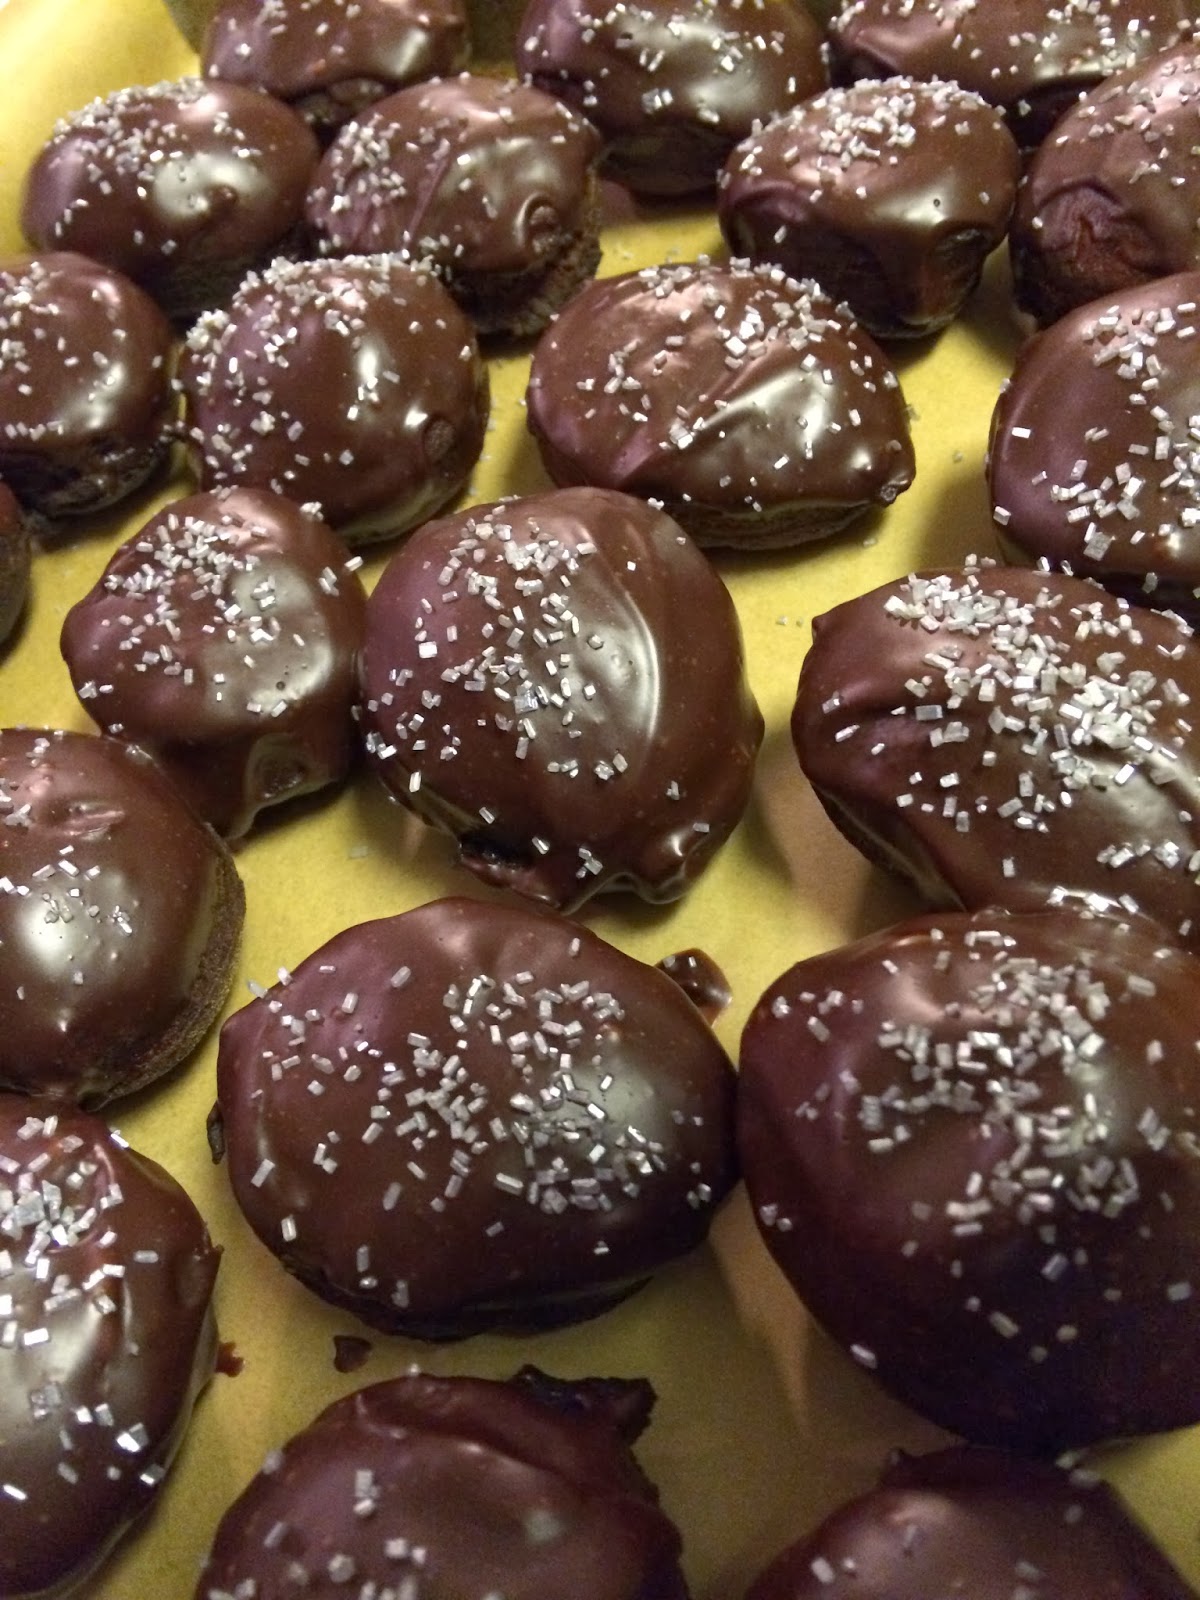 |
| Did someone say dessert? Hannukah isn't complete without donuts! These are glazed in chocolate ganache and sprinkled with silver sugar crystals. |
 |
| Gingerbread cake! I couldn't resist. |
Now for some DIY! If you love being in the kitchen and money is tight this weekend, check these out for friends, family, and (living around here, you know what I'm talking about!) doormen! Yum, yum.
For the gourmet chef...
Triple-Tart Cranberry Butter
Saveur
Makes 3 8oz jars
Ingredients
- 1 cup dried tart cherries
- 1 lb. sweet apples, such as Fuji or Braeburn, peeled, cored and cut into ½" cubes
- 12 oz. fresh cranberries
- 1½ cups pomegranate seeds
- 1⅓ cup sugar
- ½ tsp. Kosher salt
Directions
- Place cherries in a medium bowl and cover with 3 cups of boiling water; soak until tender, about 10 minutes.
- Drain, reserving 1 cup of liquid and transfer to a 4-qt. saucepan with apples, cranberries, and pomegranate seeds.
- Bring to a boil over high heat; cook, stirring occasionally, until cranberries begin to burst, about 2 minutes. Reduce heat to medium-low and continue to cook until fruit is very tender, about 30 minutes.
- Pour through a fine mesh strainer into a 2-qt. saucepan and press on solids to extract as much pulp as possible; discard solids. Add sugar and salt, and bring to a simmer over medium-high heat; cook, stirring constantly, until mixture begins to bubble, about 2 minutes. Reduce heat to medium-low and continue to cook until slightly reduced and thick, about 8 minutes more.
- If you like, divide between three sanitized 8-oz. glass jars with resealable lids and follow the procedure for Canning with a Boiling Water Bath (process filled jars for 10 minutes).
For the caramel queen...
Chocolate-Dipped Vanilla Caramels
Grace Parisi
Ingredients
- 2 sticks unsalted butter
- 2 1/2 cups granulated sugar
- 1 cup light corn syrup
- 1 cup heavy cream
- 1 vanilla bean, split and seeds scraped
- Coarse sea salt, crumbled
- 1 pound bittersweet chocolate, melted (optional)
Directions
- Line a 9-by-13-inch pan with foil; spray it with vegetable oil. In a heavy saucepan, melt the butter. Add the sugar, corn syrup and cream and bring to a boil, stirring until the sugar dissolves. Add the vanilla seeds. Cook over moderately low heat, stirring, until a golden caramel forms and the temperature reaches 245° on a candy thermometer, 1 hour. Stir in 1 tablespoon of salt and scrape the caramel into the prepared pan. Let cool and set completely overnight.
- Lightly oil a sheet of parchment paper and line 2 baking sheets with wax paper. Invert the caramel onto the parchment and peel off the foil. Using a sharp knife, cut the caramel into 1-inch-wide strips and then into 1-inch squares. Dip the squares into the chocolate, tap off the excess and transfer to the wax paper on the baking sheets. Sprinkle lightly with sea salt and refrigerate for 10 minutes. Alternatively, wrap the plain caramel squares in wax paper and tie with thread.
For the chocolate snob...you know them...
Brazilian Pecan-Cinnamon Truffles
Food & Wine, Dec 2012
Ingredients
- One 14-ounce can sweetened condensed milk
- 1 ounce white chocolate, chopped
- 1 teaspoon salted butter, plus more for rubbing
- 1 cup chopped toasted pecans
- 1 teaspoon cinnamon
Directions
- In a medium nonstick saucepan, combine the condensed milk with the white chocolate and 1 teaspoon of butter. Cook over moderately low heat, stirring constantly, until shiny and very thick, 15 to 18 minutes. Spread the mixture in a shallow dish and let cool for 15 minutes.
- Arrange 30 paper candy cups on a baking sheet. In a shallow bowl, mix the pecans with the cinnamon. Rub your hands with butter. Scoop up rounded teaspoons of the candy mixture and roll them into balls. Roll the candy in the pecan mixture and set them in a paper cup. Repeat to form the remaining candies. Serve slightly chilled or at room temperature.
NOTES Variations: The candies can also be rolled in shredded coconut, sliced almonds, chopped pistachios or rainbow sprinkles.
Happy baking!
Monday, December 9, 2013
Roll It Up Like a Snail
Happy Monday everyone! After a very busy weekend, including a non-stop day of post-Hannukah Hannukah cooking, I'm exhausted! But fear not, because I am working very hard to get back on track with recipes for you. The holiday season can be a whirlwind so I'm hoping to help you pinpoint your baking needs. Today we're talking about rolled cakes. Usually made with a jelly roll pan, these cakes are lighter and spongier, and filled with a delicious creamy frosting. They often remain un-frosted on the outside so you can get a close up look at the swirly center. Bonus: they're usually easier than you think but they have spectacular results. Here we go!
If you're still craving pumpkin...
Pumpkin Roll Cake with Toffee Cream Filling and Caramel Sauce
Bon Appetit November 1995
Ingredients
Cake
If you're still craving pumpkin...
Pumpkin Roll Cake with Toffee Cream Filling and Caramel Sauce
Bon Appetit November 1995
Ingredients
Cake
- Nonstick vegetable oil spray
- 3/4 cup cake flour
- 1 1/2 teaspoons ground cinnamon
- 1 1/4 teaspoons ground ginger
- 3/4 teaspoon ground allspice
- 6 large eggs, separated
- 1/3 cup sugar
- 1/3 cup (packed) golden brown sugar
- 2/3 cup canned solid pack pumpkin
- 1/8 teaspoon salt
- Powdered sugar
- 2 tablespoons dark rum
- 1 teaspoon unflavored gelatin
- 1 cup chilled whipping cream
- 3 tablespoons powdered sugar
- 10 tablespoons plus 1/2 cup English toffee pieces (or chopped English toffee candy; about 7 ounces)
- Additional powdered sugar
- 1 1/2 purchased caramel sauce, warmed
For Cake:
- Preheat oven to 375°F. Spray 15x10x1-inch baking sheet with vegetable oil spray. Sift flour, cinnamon, ginger and allspice into small bowl. Using electric mixer, beat egg yolks, 1/3 cup sugar and 1/3 cup brown sugar in large bowl until very thick, about 3 minutes. On low speed, beat in pumpkin, then dry ingredients. Using clean dry beaters, beat egg whites and salt in another large bowl until stiff but not dry. Fold egg whites into batter in 3 additions. Transfer to prepared pan. Bake cake until tester is inserted comes out clean, about 15 minutes.
- Place smooth (not terry cloth) kitchen towel on work surface; dust generously with powdered sugar. Cut around pan sides to loosen cake. Turn cake out onto kitchen towel. Fold towel over 1 long side of cake. Starting at 1 long side, roll up cake in towel. Arrange cake seam side down and cool completely, about 1 hour.
For Filling:
- Pour 2 tablespoons rum into heavy small saucepan; sprinkle gelatin over. Let stand until gelatin softens, about 10 minutes. Stir over low heat just until gelatin dissolves. Beat chilled whipping cream and 3 tablespoons powdered sugar in large bowl until firm peaks form. Beat in gelatin mixture. Fold in 6 tablespoons English toffee pieces.
- Unroll cake; sprinkle with 4 tablespoons English toffee pieces. Spread filling over. Starting at 1 long side and using kitchen towel as aid, roll up cake to enclose filling. Place cake seam side down on platter. (Can be prepared 1 day ahead. Cover with foil and refrigerate.)
- Trim ends of cake on slight diagonal. Dust cake with powdered sugar. Spoon some of warm sauce over top of cake. Sprinkle with 1/2 cup toffee. To serve, cut cake crosswise into 1-inch-thick slices. Pass remaining sauce.
If you like Christmas traditions...
Cherry-and-Chocolate Buche de Noel
Dominique Ansel
Ingredients
Cake
- 6 large egg yolks, at room temperature
- 3/4 cup granulated sugar
- 5 large egg whites, at room temperature
- 1/8 teaspoon kosher salt
- 1/2 cup unsweetened cocoa powder
- 1/2 cup water
- 3/4 cup sugar
- 1 tablespoon kirsch
- 1 teaspoon unflavored gelatin
- 1 tablespoon cold water
- 1/3 cup whole milk
- 1/2 vanilla bean, split and seeds scraped
- 2 large egg yolks
- 1 tablespoon granulated sugar
- 1/2 cup heavy cream
- 1 cup pitted brandied cherries, drained
- 1 cup heavy cream
- 1 1/2 teaspoons confectioners' sugar
- Unsweetened cocoa powder, for sifting
Directions
- Preheat the oven to 375. Line a 9-by-13-inch rimmed baking sheet with parchment paper. In the bowl of a standing electric mixer fitted with the whisk, beat the egg yolks with 6 tablespoons of the sugar at high speed until the mixture is pale and fluffy, and leaves a ribbon trail when the whisk is lifted, 3 minutes; transfer to a large bowl.
- Thoroughly wash and dry the mixer bowl and whisk. Add the egg whites and salt to the bowl and beat at moderately high speed until soft peaks form. Gradually add the remaining 6 tablespoons of sugar and continue beating until the whites are stiff and glossy.
- Using a rubber spatula, stir one-fourth of the beaten whites into the yolk mixture, then fold in the remaining whites until no streaks remain. Working in 2 batches, sift the cocoa over the batter and fold gently until fully incorporated. Spread the batter on the prepared baking sheet in an even layer. Bake for 18 to 20 minutes, until the cake feels springy and dry; rotate the pan halfway through baking. Transfer to a rack and let cool completely.
- In a small saucepan, combine the water and sugar and bring to a boil over high heat. Reduce the heat to moderate and simmer just until the sugar is completely dissolved, about 1 minute. Remove from the heat and stir in the kirsch.
- In a small, microwave-safe bowl, sprinkle the gelatin over the water and let stand until softened. In a small saucepan, combine the milk with the vanilla bean and seeds and bring to a simmer over moderately high heat. Meanwhile, in a medium bowl, whisk the egg yolks with the sugar.
- When the milk comes to a simmer, discard the vanilla bean. Slowly whisk the milk into the yolk mixture until thoroughly blended. Transfer the mixture to the saucepan and cook over moderately low heat, stirring constantly, until the custard is thick enough to coat the back of the spoon, about 1 to 2 minutes. Strain the custard into a medium bowl.
- Melt the gelatin in the microwave for 15 seconds; stir it into the custard and let cool. Meanwhile, whip the heavy cream until firm. Stir one-fourth of the whipped cream into the custard until incorporated, then fold in the remaining whipped cream.
- Run the tip of a knife around the edge of the cake. Cover with a clean sheet of parchment and a second baking sheet and invert the cake. Remove the first baking sheet and peel off the parchment. Brush the kirsch syrup evenly onto the cake to soak; reserve extra syrup for another use.
- Using an offset spatula, spread the filling evenly on the cake. Scatter the cherries over the filling. Use the parchment to carefully roll the cake to form a 13-inch-long log with the seam on the bottom. Fold the parchment over the log so the ends meet. Using a ruler, squeeze the cake in the parchment to tighten the roll. Refrigerate for at least 1 hour.
- Just before serving, whip the cream with the confectioners' sugar until firm. Transfer the cake to a serving platter and frost with the whipped cream. Sift the cocoa powder on top. Slice and serve.
If you like the classic look with an often favorite flavor combo...
Chocolate-Raspberry Swiss Roll
Maria Helm Sinskey
Ingredients
Cake
- 5 large eggs, separated
- 1/2 cup plus granulated sugar
- 1/2 teaspoon pure vanilla extract
- 1/2 cup cake flour
- 1/2 teaspoon salt
- 4 tablespoons unsalted butter, melted
- 2 tablespoons confectioners' sugar
Filling
- 1 1/2 cups heavy cream
- 2 teaspoons granulated sugar
- 1/2 teaspoon pure vanilla extract
- Pinch of salt
- 1/4 cup plus 2 tablespoons seedless raspberry jam
Chocolate Glaze
- 1/2 pound bittersweet chocolate, chopped
- 3/4 cup heavy cream
- 1/4 cup milk
- 1/4 cup sugar
- 4 tablespoons unsalted butter, at room temperature
- Raspberries, for garnish
Directions
- Preheat the oven to 350°. Butter a 10-by-15-inch jelly roll pan and line it with parchment paper, then butter the paper. In a medium bowl, beat the egg yolks with 1/4 cup of the granulated sugar and the vanilla until fluffy, about 3 minutes. Scrape the mixture into the bowl and fold in the flour.
- In a clean bowl using a clean whisk, beat the egg whites with the salt at medium speed until soft peaks form. Gradually add the remaining 1/4 cup of granulated sugar and beat until the whites are glossy. Using a rubber spatula, fold the whites into the yolk mixture until no streaks remain. Quickly fold in the melted butter. Spread the batter in the pan. Bake in the lower third of the oven for 20 minutes, or until golden and puffy. Let cool in the pan on a rack.
- Run the blade of a knife around the edge of the cake pan. Dust the cake with the confectioners' sugar and cover with a sheet of plastic wrap and a clean kitchen towel. Top with a cutting board and, holding both the board and pan, invert the cake. Rap the board against the table, then remove the pan and carefully peel off the paper.
- In a large bowl, whip the cream with the granulated sugar, vanilla and salt to stiff peaks. Using an offset metal spatula, spread the raspberry jam on the cake. Spread the whipped cream evenly over the jam. Begin rolling up the cake from the long side, as tightly as possible, using the kitchen towel and plastic wrap to help shape the roll. Wrap the roll tightly in the plastic and transfer to a baking sheet. Refrigerate for at least 6 hours or, preferably, overnight.
- Put the chocolate in a bowl. In a saucepan, stir the cream, milk and sugar over moderate heat just until the sugar is dissolved. Pour the hot cream over the chocolate; let stand until the chocolate is melted, 3 minutes. Whisk until smooth, then whisk in the butter and let cool slightly.
- Discard the plastic wrap and transfer the cake to a rack. Pour half of the chocolate glaze all over the top and sides and spread it evenly with an offset spatula. Spread the remaining glaze all over the cake and refrigerate until set, at least 2 hours. Garnish the top with raspberries. Transfer the cake to a platter, cut into slices and serve.
Happy baking!
Subscribe to:
Posts (Atom)