Follow Me on Pinterest

Friday, January 31, 2014

Sweet and Savory Special Treat!

Happy Friday everyone! Last night's dinner was a mish mosh of delicious recipes, but the sweet and savory bread was one I just had to share! The author recommends this as an appetizer bread, cut into triangles, but my husband and I were just as happy having it with dinner, still warm from the oven. YUM. I hope you enjoy this one as much as we did.

Savory Olive Oil Bread With Figs and Hazelnuts


Martha Rose Shulman, adapted from Cooking on Rue Tatin

Ingredients
  • 60 grams (1/2 cup) hazelnuts
  • 125 grams (approximately 1 cup) whole wheat flour
  • 80 grams (approximately 1/2 cup plus 2 tablespoons) unbleached all-purpose flour
  • 12 grams (1 tablespoon) baking powder
  • 15 grams (1 tablespoon) sugar
  • 8 grams (1 teaspoon) salt
  • 1 gram (1/4 teaspoon) ground black pepper
  • 2 grams (1/2 teaspoon) fennel seeds, crushed or coarsely ground in a spice mill
  • 4 eggs
  • 100 grams (1/2 cup) extra virgin olive oil
  • 75 grams (1/4 cup) milk
  • 2 to 3 teaspoons finely chopped orange zest (optional)
  • 210 grams (7 ounces) dried figs, stemmed and coarsely chopped

Directions
  1.  Preheat the oven to 300 degrees. Place the hazelnuts on a baking sheet and toast for 20 to 35 minutes, until lightly browned. Remove from the oven and pour the hazelnuts onto a clean dishtowel. Fold over the dishtowel and rub the hazelnuts to loosen and remove the skins. Allow to cool completely.
  2. Place the skinned hazelnuts in a pastry bag or plastic bag and roll over them with a rolling pin, just to break the nuts in half. Set aside. Turn the oven up to 400 degrees. Oil or butter an 8 1/2 x 4 1/2 (or 8 x 4)-inch bread pan. Line with parchment, oil or butter the parchment, and dust lightly with flour.
  3. Sift together the flours, baking powder, sugar, salt and pepper. Stir in the fennel seeds.
  4. In a large bowl or in the bowl of an electric mixer whisk the eggs until frothy. Whisk in the olive oil and the milk. Add the optional orange zest. Whisk in the flour mixture and beat just until incorporated. Fold in the hazelnuts and chopped figs.
  5. Scrape the batter into the bread pan. Place in the oven and bake 40 to 45 minutes, until golden and a tester comes out clean. Remove from the oven and turn out onto a rack. Remove the parchment after 5 minutes and allow to cool completely. To serve, cut in thin slices and cut the slices in half on the diagonal, or into quarters.
Yield: One 8-inch loaf, about 20 slices
Advance preparation: This will keep for a couple of days if well wrapped and freezes well.

Wednesday, January 29, 2014

Why Choose Between Cake and Cookie?

It's Wednesday night, the soup has been served, the belly warmed, and the computer lights are glowing. We know what that means - sweet, sweet recipes! Tonight's question: do you have to choose between eating cake or a cookie? NO! Choose a cakey cookie (they're delicious)! You get the easy grab and go option of a cookie, but the soft and delicate texture of a cake. These recipes give you the best of both worlds!

Chocolate Brownie Cookies
Alison Roman

Ingredients
  • 3 cups gluten-free powdered sugar
  • 3/4 cup unsweetened cocoa powder
  • 1 teaspoon kosher salt
  • 2 large egg whites
  • 1 large egg
  • 4 ounces bittersweet chocolate, chopped
  • 3 tablespoons cacao nibs
Directions
  1. Place racks in lower and upper thirds of oven; preheat to 350°F. Whisk powdered sugar, cocoa powder, and salt in a large bowl, then whisk in egg whites and egg; fold in chocolate and cacao nibs. Spoon batter by the tablespoonful onto 2 parchment-lined baking sheets, spacing 2" apart.
  2. Bake, rotating sheets once, until cookies are puffed, cracked, and set just around the edges, 14–16 minutes.
  3. Transfer baking sheets to wire racks and let cookies cool on pan (they'll firm up).
DO AHEAD: Cookies can be baked 3 days ahead. Store airtight at room temperature.


Cakey Chocolate Chip Cookies
Food Network Kitchens

Ingredients
  • 3 3/4 cups cake flour
  • 2 tablespoons cornstarch
  • 1 teaspoon kosher salt
  • 3/4 teaspoon baking powder
  • 1/2 teaspoon baking soda
  • 2 sticks cold unsalted butter, cubed
  • 1/4 cups packed light brown sugar
  • 1/2 cup granulated sugar
  • 2 large eggs, at room temperature
  • 1 1/2 cups semisweet chocolate chips
Directions
  1. Whisk the flour, cornstarch, salt, baking powder and baking soda in a large bowl.
  2. Beat the butter, brown sugar and granulated sugar in a bowl with a mixer on medium speed until combined but still slightly lumpy (use the paddle attachment for a stand mixer). The biggest lumps should be about the size of small peas; do not overbeat. Beat in the eggs one at a time. Reduce the mixer speed to low; add the flour mixture in batches and beat until combined. Stir in the chocolate chips by hand. Press plastic wrap directly onto the surface of the dough and refrigerate at least 2 hours or preferably overnight.
  3. Preheat the oven to 375 degrees F. Line 2 baking sheets with parchment paper. Drop 2 1/2-inch scoops of dough onto the prepared baking sheets, about 2 inches apart. Bake until the cookies are barely golden around the edges, about 20 minutes, rotating the baking sheets halfway through. Turn off the oven but keep the cookies inside for 5 more minutes to set. Remove the cookies from the oven and let cool 10 minutes on the baking sheets, then transfer to a rack to cool completely.


Mini Black-and-White Cookies
Gourmet, December 2005

Ingredients

For cookies
  • 1 1/4 cups all-purpose flour
  • 1/2 teaspoon baking soda
  • 1/2 teaspoon salt
  • 1/3 cup well-shaken buttermilk
  • 1/2 teaspoon vanilla
  • 7 tablespoons unsalted butter, softened
  • 1/2 cup granulated sugar
  • 1 large egg
For icings
  • 2 3/4 cups confectioners sugar
  • 2 tablespoons light corn syrup
  • 2 teaspoons fresh lemon juice
  • 1/2 teaspoon vanilla
  • 4 to 6 tablespoons water
  • 1/4 cup unsweetened Dutch-process cocoa powder
Directions

Make cookies:
  1. Put oven racks in upper and lower thirds of oven and preheat oven to 350°F. Butter 2 large baking sheets.
  2. Whisk together flour, baking soda, and salt in a bowl. Stir together buttermilk and vanilla in a cup.
  3. Beat together butter and sugar in a large bowl with an electric mixer at medium-high until pale and fluffy, about 3 minutes, then add egg, beating until combined well. Reduce speed to low and add flour mixture and buttermilk mixture alternately in batches, beginning and ending with flour mixture, and mixing just until smooth.
  4. Drop rounded teaspoons of batter 1 inch apart onto baking sheets. Bake, switching position of sheets halfway through baking, until tops are puffed, edges are pale golden, and cookies spring back when touched, 6 to 8 minutes total. Transfer to a rack to cool.
Make icings while cookies cool:
  1. Stir together confectioners sugar, corn syrup, lemon juice, vanilla, and 2 tablespoons water in a small bowl until smooth. If icing is not easily spreadable, add more water, 1/2 teaspoon at a time. Transfer half of icing to another bowl and stir in cocoa, adding more water, 1/2 teaspoon at a time, to thin to same consistency as vanilla icing. Cover surface with a dampened paper towel, then cover bowl with plastic wrap.
Ice cookies:
  1. With offset spatula, spread white icing over half of flat side of each cookie. Starting with cookies you iced first, spread chocolate icing over other half.
Notes: Once icing is dry, cookies keep, layered between sheets of wax paper or parchment, in an airtight container at room temperature 4 days.


Happy baking!

Monday, January 27, 2014

Football Countdown!

Happy Monday! We're at the beginning of Superbowl week here in the tri-state area, and New York City and NJ are gearing up from an awesome game. Are you ready? Are your desserts planned? Make it easy on yourself and keep it simple; pile on the finger foods for your guests or your family and spend less time in the kitchen and more in front of the TV. Here are a few more Superbowl recipes that are easy, fun, and festive. (More importantly, they can all be made ahead of time! So crack open that beer early on Sunday and enjoy your day!)

Salted Fudge Brownies
Kate Krader

Ingredients
  • 1 1/2 sticks unsalted butter
  • 2 ounces unsweetened chocolate, finely chopped
  • 1/4 cup plus 2 tablespoons unsweetened cocoa
  • 2 cups sugar
  • 3 large eggs
  • 1 1/2 teaspoons pure vanilla extract
  • 1 cup all-purpose flour
  • 1/2 teaspoon Maldon sea salt
Directions
  1. Preheat the oven to 350°. Line a 9-inch square metal cake pan with foil, draping the foil over the edges. Lightly butter the foil.
  2. In a large saucepan, melt the butter with the unsweetened chocolate over very low heat, stirring occasionally. Remove from the heat. Whisking them in one at a time until thoroughly incorporated, add the cocoa, sugar, eggs, vanilla and flour. Pour the batter into the prepared pan and smooth the surface. Sprinkle the salt evenly over the batter. Using a butter knife, swirl the salt into the batter.
  3. Bake the fudge brownies in the center of the oven for about 35 minutes, until the edge is set but the center is still a bit soft and a toothpick inserted into the center comes out coated with a little of the batter. Let the brownies cool at room temperature in the pan for 1 hour, then refrigerate just until they are firm, about 1 hour. Lift the brownies from the pan and peel off the foil. Cut the brownies into 16 squares. Serve at room temperature.
MAKE AHEAD The salted fudge brownies can be refrigerated for up to 3 days, and frozen for up to 1 month.


Chocolate Chocolate Chip Cookies
Gourmet Feb 1999

Ingredients
  • 1 1/4 cups all-purpose flour
  • 2 tablespoons unsweetened Dutch-process cocoa powder
  • 1 teaspoon baking powder
  • 3/4 teaspoon salt
  • 1 pound fine-quality bittersweet chocolate (not unsweetened)
  • 1 stick (1/2 cup) unsalted butter
  • 1/2 cup sugar
  • 3 large eggs
Directions
  1. Preheat oven to 350°F. and line a large baking sheet with parchment paper.
  2. Into a bowl sift together flour, cocoa and baking powders, and salt. Coarsely chop chocolate. In a double boiler or a large metal bowl set over a saucepan of barely simmering water melt butter with three fourths chocolate, stirring until smooth.
  3. Remove chocolate mixture from heat and stir in sugar. Stir in eggs 1 at a time until combined well and stir in flour mixture until just combined. Chill dough, covered, at least 10 minutes and up to 1 hour.
  4. Drop rounded tablespoon measures of dough about 1‚ inches apart onto baking sheet and stud each cookie with a few pieces remaining chocolate. Bake in middle of oven 10 minutes, or until just set. Cool cookies on sheet on rack 5 minutes and transfer with a spatula to rack to cool completely. Make more cookies with remaining dough in same manner. Cookies may be kept in an airtight container at room temperature 3 days.

Peanut Butter Football Cookie
Food Network Kitchens

Ingredients
Cookie
  • Nonstick cooking spray
  • 1/2 cup old-fashioned oats
  • 1 1/4 cups all-purpose flour
  • 1/2 teaspoon baking soda
  • 1/2 teaspoon fine salt
  • 1 stick unsalted butter, softened
  • 1 cup plus 2 teaspoons granulated sugar
  • 1 large egg
  • 1 cup smooth peanut butter
  • 2 teaspoons pure vanilla extract
Frosting
  • 1 stick unsalted butter
  • 1 cup confectioners' sugar
  • 1 tablespoons milk
  • 1 teaspoon pure vanilla extract
  • Pinch fine salt
Directions
  1. For the cookie: Preheat the oven to 350 degrees F. Line a rimmed baking sheet with parchment paper and spray with nonstick cooking spray.
  2. Pulse the oats in a food processor or mini chopper until finely ground. Whisk the ground oats, flour, baking soda and salt in a medium bowl.
  3. Mix the butter and 1 cup of the granulated sugar on medium-high speed until light and fluffy, using either a hand mixer with a large bowl or a stand mixer with the paddle attachment, about 4 minutes. Add the egg and beat until well incorporated. Beat in the peanut butter and vanilla until smooth and creamy, about 2 minutes. With the mixer on low, gradually add the flour mixture until the dough is well combined.
  4. Scrape the dough onto the prepared baking sheet. Using your hands, flatten and form the dough into a football shape, about 1/2 inch thick. Sprinkle the remaining 2 teaspoons sugar over the surface. Bake until the cookie is light golden brown and set, 20 to 25 minutes. Allow to cool completely, about 15 minutes.
  5. For the frosting: Beat the butter until creamy on medium speed in a medium bowl. Add the confectioners' sugar, milk, vanilla and salt. Beat until thick and creamy. Spoon the frosting into a quart-size zippered bag. Snip a small piece from the corner and pipe to create football laces or any other desired decorations.
Happy baking!

Thursday, January 23, 2014

Cornbread Croutons on My Salad!

It's Thursday, bitter cold, and my belly is far too full with delicious desserts. What's a girl to do? Eat a fabulously filling salad, of course! This particular gem is pretty great because it includes one of my favorite breads (cornbread!) and toasts it into croutons. Super yum. Let's get right too it!


Black-Eyed Pea and Watercress Salad with Corn Bread Croutons
Sean Brock

Ingredients
Cornbread
  • 4 ounces bacon, finely chopped
  • 2 to 3 tablespoons canola oil, plus more for greasing
  • 2 cups medium-grind yellow cornmeal
  • 1 1/2 teaspoons kosher salt
  • 1/2 teaspoon baking powder
  • 1/2 teaspoon baking soda
  • 1 1/2 cups buttermilk
  • 2 large eggs, lightly beaten
Vinaigrette
  • 1/3 cup extra-virgin olive oil
  • 1/4 cup apple cider vinegar
  • 1/4 cup chopped parsley
  • 1/4 teaspoon Aleppo pepper
  • Pinch of sugar
  • Kosher salt
Black-Eyed Peas
  • 1 tablespoon canola oil
  • 2 ounces bacon, cut into 1/4 -inch-dice
  • 2 1/4 cups dried black-eyed peas (15 ounces)
  • 2 quarts chicken stock or low-sodium broth
  • 5 thyme sprigs
  • 1 bay leaf
  • 2 tablespoons unsalted butter, melted
  • 2 tablespoons fresh lemon juice
  • 1 tablespoon hot sauce
  • 1 bunch watercress (6 ounces), tough stems discarded
  • Kosher salt
  • Freshly ground white pepper
Directions
MAKE THE CORN BREAD 
  1. Preheat the oven to 450°. Heat a 9-inch cast-iron skillet in the oven for at least 10 minutes.
  2. In a large nonstick skillet, cook the bacon over moderately low heat, stirring frequently, until crisp and the fat has rendered, 7 to 8 minutes. Transfer the bacon to paper towels to drain. Scrape the bacon fat into a small measuring cup and stir in enough canola oil to make 5 tablespoons total.
  3. In a large bowl, whisk the cornmeal with the salt, baking powder, baking soda and bacon. In a medium bowl, whisk the buttermilk with the eggs and bacon oil. Stir the wet ingredients into the cornmeal mixture.
  4. Grease the hot cast-iron skillet with canola oil. Add the corn bread batter, spreading it evenly. Bake for about 20 minutes, until the corn bread is golden and a toothpick inserted in the center comes out clean. Transfer to a rack and let cool slightly, then unmold the corn bread and let cool completely. Cut half of the corn bread into 1/2-inch cubes; reserve the rest for another use.
MEANWHILE, MAKE THE VINAIGRETTE
  1. In a small bowl, whisk together all of the ingredients and season with salt. Let stand at room temperature for 1 hour.
PREPARE THE BLACK-EYED PEAS 
  1. In a large pot, heat the canola oil. Add the bacon and cook over moderate heat for 3 minutes, stirring occasionally. Add the peas, stock, thyme and bay leaf and bring to a boil. Cover and cook over low heat until the peas are tender, about 45 minutes. Drain the peas and discard the thyme sprigs and bay leaf; reserve the cooking liquid for another use.
  2. Transfer the peas to a large bowl and stir in the butter, lemon juice and hot sauce. Season with some of the vinaigrette. Add the watercress, season with salt and white pepper and toss. Transfer the salad to plates and garnish with the corn bread croutons. Serve the extra vinaigrette on the side.
MAKE AHEAD The cooked black-eyed peas can be refrigerated for up to 3 days. The corn bread can be stored at room temperature for up to 2 days.

Lizzy Bee's Notes:
Make it faster: Use a 15 oz can of your favorite bean - I used white beans.
Make it veggie-friendly: Ignore the cornbread recipe and just make your favorite cornbread! For the meat-eater, sprinkle crispy bacon on top. They'll still go wild!
Can't find watercress? Use spinach. It's the deep green veggie that is best for your body and really fills you up!

Wednesday, January 22, 2014

Countdown to the Superbowl!

Lemon poppy seed pound cake in the
foreground, pound cake in the back!
Happy Wednesday everyone! We're over a week 'til the Superbowl, but as you can imagine the NYC tri-state is all abuzz. To get you ready, I've got a few finger-friendly party desserts that'll cater to the crowd. One easy idea? Bake your favorite pound cake (or buy Sara Lee if you're busy), top with ice cream, and no one will mind using a spoon! Not enough? Check out some of these great ideas...


Chocolate Marshmallow Sandwiches
Todd English

Ingredients
Cookies
  • 3 1/2 cups all-purpose flour
  • 1 1/4 cups whole wheat flour
  • 1 1/2 teaspoons salt
  • 3/4 teaspoon baking soda
  • 2 1/2 sticks (10 ounces) unsalted butter, softened
  • 2/3 cup confectioners' sugar
  • 1/3 cup granulated sugar
  • 1 large egg, beaten
  • 1/4 cup honey
  • 1 tablespoon heavy cream
Filling and Topping
  • 1 3/4 cups warm water
  • 3 envelopes unflavored powdered gelatin
  • 3 cups sugar
  • 1 1/2 cups light corn syrup
  • 6 large egg whites
  • 1/4 teaspoon cream of tartar
  • 1/4 teaspoon salt
  • 3 ounces unsweetened chocolate—coarsely chopped, melted and cooled
  • 1 tablespoon pure vanilla extract
  • Cornstarch
  • 1 pound milk chocolate—coarsely chopped, melted and cooled slightly
  • 3 ounces white chocolate—coarsely chopped, melted and cooled slightly
  • 3 ounces semisweet chocolate—coarsely chopped, melted and cooled slightly
Directions
  1. In a large bowl, combine the all-purpose flour, whole wheat flour, salt and baking soda. In a standing mixer fitted with the paddle, beat the butter with the confectioners' sugar and granulated sugar until light and fluffy. Beat in the egg, followed by the honey and cream. Gradually beat in the flour mixture until a dry dough forms. Pat the dough into 2 disks, wrap them in plastic and refrigerate until chilled, about 30 minutes.
  2. Preheat the oven to 350°. On a lightly floured work surface, roll out 1 disk of dough 1/4 inch thick. Using a 3-inch round biscuit cutter, cut out 20 rounds. Place the rounds on 2 large cookie sheets and bake for 8 minutes. Turn the cookies over and bake for about 5 minutes longer, or until lightly browned. Transfer the cookies to a rack to cool. Repeat with the second disk of dough.
  3. Pour 3/4 cup of the water into a small saucepan and sprinkle the gelatin evenly over the surface. Let stand until the gelatin softens, then heat the water over moderate heat just until the gelatin dissolves completely. Keep warm.
  4. Meanwhile, in a medium saucepan, combine 2 1/2 cups of the sugar with the corn syrup and the remaining 1 cup of water and bring to a boil, stirring until the sugar dissolves. Reduce the heat to moderate and simmer until the syrup reaches 240° on a candy thermometer, about 20 minutes. Carefully stir in the warm gelatin mixture.
  5. In a standing mixer fitted with the whisk, beat the egg whites with the cream of tartar and salt until soft peaks form. With the machine on, gradually add the remaining 1/2 cup of sugar and beat until stiff peaks form. Beating constantly, slowly pour the hot sugar syrup down the side of the bowl and beat the meringue until it is thick and almost cool, about 8 minutes.
  6. Meanwhile, lightly oil a 12-by-18-inch rimmed baking sheet or jelly-roll pan. When the meringue is almost cool, beat in the melted unsweetened chocolate and vanilla. Pour the marshmallow filling into the prepared pan and smooth the surface with a large offset spatula. Let the marshmallow firm up at room temperature, at least 4 hours or overnight.
  7. Dip a 3-inch round biscuit cutter in cornstarch and cut out 20 marshmallow rounds as close together as possible. Arrange half of the cookies, face down, on a work surface. Spoon a scant teaspoon of the milk chocolate in the center of each cookie and set a marshmallow round on top. Spoon another scant teaspoon of the milk chocolate in the center of each marshmallow and cover with the remaining cookies, face up. Refrigerate the cookies until the chocolate hardens, about 5 minutes.
  8. Line 2 large baking sheets with wax paper. Dip the top of each sandwich into the milk chocolate, letting any excess drip back into the bowl. Set the sandwiches on the baking sheet, chocolate side down. Spread the remaining milk chocolate over the sandwiches, coating them completely. Using a small spoon, drizzle the white and semisweet chocolates over the sandwiches and refrigerate until set.
MAKE AHEAD The sandwiches can be stored in an airtight container for 3 days.


Gooey Chocolate-Chip Sandwich Bars
Sally Sampson

Ingredients
  • 2 cups semisweet chocolate chips
  • One 14-ounce can sweetened condensed milk
  • 2 teaspoons pure vanilla extract
  • Dried Cranberry and Chocolate Cookie dough (see below)
Directions
  1. Preheat the oven to 350°. Lightly butter a 9-by-13-inch baking dish. Line the dish with parchment paper, leaving 1 inch of overhang on the long sides.
  2. In a small saucepan, melt the chocolate chips in the sweetened condensed milk over low heat, stirring constantly, until smooth and thickened, 3 to 5 minutes. Remove from the heat. Stir in the vanilla and let cool to room temperature.
  3. Press half of the cookie dough into the prepared baking dish. Pour the cooled chocolate mixture over the dough and spread evenly. Top with small dollops of the remaining cookie dough; don't worry if the dollops don't completely cover the chocolate mixture. Bake for 20 to 25 minutes, until the top is lightly browned. Let cool completely before cutting into bars.
MAKE AHEAD The bars can be stored in an airtight container for up to 4 days. 
NOTES The cranberries can be omitted from the cookie dough if desired.

Dried Cranberry and Chocolate Cookie Dough
Sally Sampson

Ingredients
  • 2 cups all-purpose flour
  • 1 cup quick-cooking or old-fashioned rolled oats
  • 1 teaspoon baking powder
  • 1 teaspoon baking soda
  • 1 teaspoon kosher salt
  • 2 1/2 sticks unsalted butter (10 ounces), at room temperature
  • 1 cup light brown sugar
  • 1/2 cup granulated sugar
  • 1 large egg, at room temperature
  • 1 large egg yolk, at room temperature
  • 1 tablespoon pure vanilla extract
  • 1 1/2 cups semisweet or white chocolate chips
  • 1 1/2 cups dried cranberries
Directions
In a medium bowl, mix the flour with the oats, baking powder, baking soda and salt. In a standing mixer fitted with the paddle, beat the butter and both sugars at medium speed until creamy. Add the egg followed by the egg yolk and vanilla, beating well between additions and scraping down the side of the bowl as necessary. Beat in the dry ingredients, then add the chocolate chips and cranberries and beat until incorporated.


Homemade Yodels
Sue McCown

Ingredients
  • 5 large eggs, separated
  • 3/4 teaspoon cream of tartar
  • 1 1/4 cups confectioners' sugar
  • 1/4 cup all-purpose flour
  • 3 tablespoons unsweetened cocoa, plus more for dusting
  • 1 1/2 teaspoons pure vanilla extract
  • 1/2 cup plus 2 tablespoons granulated sugar
  • 1 1/4 cups plus 2 tablespoons heavy cream
  • 2 tablespoons unsalted butter
  • 2 tablespoons sour cream
  • Pinch of salt
  • 12 ounces bittersweet or semisweet chocolate, chopped
  • 1/4 cup vegetable oil
Directions
  1. Preheat the oven to 325°. Lightly butter two 10 1/2-by-15 1/2-inch jelly roll pans and line the bottoms with parchment paper. Butter the paper. Dust the pans with flour, tapping out any excess.
  2. In a large bowl, using an electric mixer, beat the egg whites with 1/2 teaspoon of the cream of tartar at high speed until soft peaks form. Add 1/2 cup of the confectioners' sugar and beat at high speed until stiff and glossy.
  3. In another large bowl, beat the egg yolks until pale, about 2 minutes. Add the flour, 3 tablespoons of cocoa, 1/2 cup of the confectioners' sugar and 1 teaspoon of the vanilla and beat at low speed until combined. Beat in one fourth of the egg whites, then fold in the remaining whites until no streaks remain. Pour the batter into the prepared pans and spread in a thin, even layer. Bake the cakes for 6 minutes, until firm and slightly puffed. Transfer the pans to a rack and let cool for 5 minutes.
  4. Run the tip of a knife around the edge of the cakes. Dust the cakes with cocoa and cover each one with a sheet of wax paper slightly larger than the pan. Invert the cakes onto the wax paper and remove the pans. Cover the cakes with plastic wrap to keep moist.
  5. In a small bowl, combine 2 tablespoons of very hot water with 2 tablespoons of the granulated sugar and stir until the sugar is dissolved. Let the sugar syrup cool to room temperature.
  6. In a small saucepan, combine the remaining 1/2 cup of granulated sugar and 1/4 teaspoon of cream of tartar with 3 tablespoons of water and cook over moderately high heat, washing down the sides of the pan with a wet pastry brush and gently swirling the pan, until a deep amber caramel forms, about 6 minutes. Remove from the heat. Add 1/4 cup plus 2 tablespoons of the heavy cream and the butter and stir just until combined. Cook over high heat for 1 minute. Transfer the caramel sauce to a heatproof bowl and let cool completely.
  7. In a large bowl, using an electric mixer, combine the remaining 1 cup of heavy cream with 1/4 cup of the confectioners' sugar and 1/2 teaspoon of the vanilla. Beat in the sour cream and salt, then beat until firm peaks form. Fold in the cooled caramel sauce and refrigerate.
  8. Peel the parchment paper off both cakes and brush the surfaces with the sugar syrup. Spread the caramel cream over each cake in a thin even layer. Working with the long side nearest you, roll up each cake, using the wax paper to help you form a tight roll. Wrap the rolls in the wax paper, transfer to a baking sheet and freeze until very firm, about 2 hours.
  9. Melt the chopped chocolate in a medium microwave-safe bowl. Whisk in the oil. Let the glaze cool slightly. Line a baking sheet with wax paper. Unwrap the rolls and cut each one into 5 pieces. Working quickly, dip both ends of each roll into the chocolate glaze, then dip the tops and bottoms, letting any excess glaze drip back into the bowl. Place the rolls on the prepared baking sheet and refrigerate just until the glaze is completely set. Serve the yodels cold or at room temperature.
MAKE AHEAD The chilled yodels can be individually wrapped in plastic and refrigerated for up to 4 days or frozen for up to 2 weeks.


Happy baking!

Tuesday, January 21, 2014

Supporting Your Cake From the Bottom Up

Happy snowy Tuesday everyone! Yesterday's post is coming today as I've recently finished a baby shower cake. The latest of the Lizzy Bee's creations was a two layer rich white cake filled with milk chocolate fudge frosting, hugged in Madagascar vanilla buttercream, and enrobed in buttercream-flavored fondant dyed the mom-to-be's colors of choice! Since this mommy is having both a boy and a girl, she celebrated with pink and blue accents and little teddy bear decorations. Here's the finished product:


People often wonder about layering a cake without it sinking. Though I always always use a lot of support, I am always nervous while taking a cake to a location - and the fear was doubled when this cake was picked up a day early! In order to secure any kind of stacked cake, you will want to use dowels of some kind. Often this can just be popsicle sticks, cut down to the proper size. Make sure you measure - if you don't, your top cake will sit too high and you will see between the two layers, making it look unfinished! I used a lot of popsicle sticks for this cake. Take a look: 


Look in the middle of my layer - do you see the sticks? I stuck them in the cake so they would be hidden from view, but would fit perfectly under the top layer! You can eyeball this measurement, but if you're not sure, just measure your location on the bottom cake to make sure it fits within the top cake's diameter. This particular cake was interesting because it had two very heavy bears (made of rice krispies) sitting on top in front of the layer! Though my cakes are very dense, they are still just cake, and sinking can occur. I used thick plastic dowels under the bears to ensure their safety overnight. These are also great under the top cake layer as well, or you can use wooden dowels if that's more preferable. Consider your own home kitchen - what would be easiest to cut to the proper size? Wooden dowels would probably require a tool kit, while plastic ones can be cut with an x-acto knife and work just as well! It's your hard work and your choice, so do what works best for you! In the end you'll have a beautiful cake at which everyone will marvel at your culinary expertise! 

Happy baking!

Wednesday, January 15, 2014

Baking a Cake...

In the process of a major cake order for this weekend. Smells of rich and dense white cake are wafting from my oven...

Tuesday, January 14, 2014

Warm Your Soul on a Rainy Day

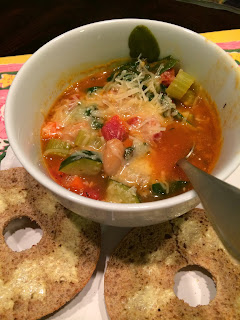
Happy Tuesday on this rainy glum day here in the tri state. What better time than when it's cold and dreary out to stay warm and cozy inside? If you're looking to stay full and satisfied with less calories (after all, most of us are still recovering from the holidays), this one is for you! Sprinkle on the parm and enjoy!

Tuscan Vegetable Soup
Ellie Krieger

Ingredients
  • 1 (15-ounce) can low-sodium canellini beans, drained and rinsed
  • 1 tablespoon olive oil
  • 1/2 large onion, diced (about 1 cup)
  • 2 carrots, diced (about 1/2 cup)
  • 2 stalks celery, diced, (about 1/2 cup)
  • 1 small zucchini, diced (about 1 1/2 cups)
  • 1 clove garlic, minced
  • 1 tablespoon chopped fresh thyme leaves (or 1 teaspoon dried)
  • 2 teaspoons chopped fresh sage leaves (or 1/2 teaspoon dried)
  • 1/2 teaspoon salt
  • 1/4 teaspoon freshly ground black pepper
  • 32 ounces low-sodium chicken broth or vegetable broth
  • 1 (14.5-ounce) can no salt added diced tomatoes
  • 2 cups chopped baby spinach leaves
  • 1/3 cup freshly grated Parmesan, optional
Directions
  1. In a small bowl mash half of the beans with a masher or the back of a spoon, and set aside.
  2. Heat the oil in a large soup pot over medium-high heat. Add the onion, carrots, celery, zucchini, garlic, thyme, sage, 1/2 teaspoon of salt and 1/4 teaspoon of pepper, and cook stirring occasionally until the vegetables are tender, about 5 minutes.
  3. Add the broth and tomatoes with the juice and bring to a boil. Add the mashed and whole beans and the spinach leaves and cook until the spinach is wilted, about 3 minutes more.
  4. Serve topped with Parmesan, if desired.

Monday, January 13, 2014

Opa! Greek Eats at Home!

Happy Monday all! My husband and I got take out from a delicious Greek restaurant near our home, and I've had a craving for baklava ever since! I love the way that crisp yet delicate phylo dough crumbles on your lips when you take that first bite; the explosion of sweet honey taste coated in gooey honey and wrapped inside that crispy shell. Can you tell I haven't gotten my fill? So in honor of my stomach's rumble and people's confusion over my background (I am not Greek, though I guess I look it), I present you 3 different recipes for baklava. Opa!

The Food Network way...
Baklava 
Michael Symon

Ingredients
For the Baklava

  • 1 pound pistachios and/or walnuts, coarsely ground, plus more for garnish
  • 1/2 teaspoon ground cinnamon, or to taste
  • 1 cup ground zwieback crackers or breadcrumbs
  • 4 sticks unsalted butter, melted
  • 16 sheets phyllo dough (thawed, if frozen), cut in half
For the Syrup

  • 3 cups sugar
  • 1 6-to-8-ounce jar honey
  • 1 to 2 tablespoons fresh lemon juice

Directions

  1. Position a rack in the lower third of the oven; preheat to 350 degrees F. Combine the nuts, cinnamon and ground crackers in a bowl.
  2. Brush a 9-by-13-inch baking dish with some of the butter. Layer 10 pieces of phyllo in the dish, brushing each piece with butter before adding the next (keep the remaining dough covered with a damp towel). Sprinkle a quarter of the nut mixture over the dough. Layer 4 pieces of phyllo on top, brushing each with butter before adding the next; sprinkle with another quarter of the nut mixture. Add 4 more phyllo pieces on top, brushing each with butter, then add another quarter of the nut mixture, 4 more pieces of phyllo with butter, and the remaining nuts.
  3. Layer the remaining 10 pieces of phyllo on top of the nuts, brushing each with butter; brush the top piece with extra butter. Cut into the baklava to make strips, about 1 1/2 inches wide. Then make diagonal slices, about 1 1/2 inches apart, to create a diamond pattern. Bake until golden, about 1 hour.
  4. Meanwhile, make the syrup: Bring the sugar, honey and 1 1/2 cups water to a boil in a saucepan over medium heat and cook, 10 to 15 minutes. Add the lemon juice and boil 2 more minutes, then let cool slightly.
  5. Pour the syrup over the warm baklava; let soak, uncovered, at least 6 hours or overnight. Garnish with nuts.


The over-achiever's way...
Rosie's Baklava Ice Cream Cake
Rosie Rosenbloom

Ingredients

  • 1 cup slivered almonds (about 4 ounces)
  • 1 cup walnuts (about 4 ounces)
  • 3 tablespoons sugar
  • 1/2 teaspoon cinnamon
  • 1/4 teaspoon freshly grated nutmeg
  • 1/8 teaspoon ground cloves
  • sixteen 17- x 12-inch phyllo sheets (#4 size)
  • 1/2 cup unsalted butter
For the Syrup
  • 1/2 lemon
  • 1 cup water
  • 1 cup sugar
  • 2 tablespoons honey
  • 1/2 gallon superpremium vanilla ice cream

Directions

  1. With a sharp knife finely chop almonds and walnuts separately. (Resist the temptation to use a food processor; chopping by hand is the key to the texture of baklava.) In a bowl stir together nuts, sugar, and spices. Put stack of phyllo sheets on a work surface and cover with 2 overlapping sheets of plastic wrap and then a damp kitchen towel. Melt butter and keep warm. (If butter cools, it will be too thick to brush.)
  2. Preheat oven to 350°F.
  3. With a pastry brush brush a 17 1/2- x 12 1/2- x 1-inch baking pan with some butter. Cover bottom of pan with a phyllo sheet, keeping remaining sheets covered with plastic wrap and towel, and lightly brush with butter. Layer 7 more phyllo sheets, brushing each sheet with butter, in same manner. Sprinkle nut mixture over buttered phyllo and with your fingers gently spread evenly.
  4. On a work surface (not on top of nut layer) lightly butter and stack remaining 8 phyllo sheets, making sure top sheet is well-buttered. Transfer phyllo stack to baking pan, putting it on nut layer and pressing to help it adhere to nuts. With a fork prick top phyllo stack all over at 1/4-inch intervals going through to nut layer, to keep it from puffing unevenly. With sharp knife halve baklava crosswise and bake in middle of oven until golden brown, about 30 minutes.
Make syrup while baklava is baking:
  1. Halve lemon half. In a 1 1/2-quart saucepan boil water, sugar, and lemon over moderate heat, stirring until sugar is dissolved and liquid is reduced to about 1 1/3 cups, about 10 minutes. Remove pan from heat and stir in honey. Discard lemon and cool syrup to warm.
  2. Pour warm syrup over hot baklava and cool in pan on a rack 15 to 30 minutes. (Baklava will absorb syrup.) Do not let baklava cool more than 30 minutes before assembling cake or phyllo layers will become too soft to transfer.
  3. While baklava is cooling, soften ice cream. (We softened ours in a microwave set on defrost, 30% power, 1 1/2 to 2 minutes. Alternatively, you can leave it in the refrigerator — not on the counter —30 minutes).
Assemble cake:
  1. Using two 30-inch-long sheets of foil, line a 13- x 9- x 2-inch baking pan, arranging 1 sheet lengthwise and 1 sheet crosswise. With a large metal spatula carefully slide 1 baklava half into pan and top with ice cream, spreading evenly. Slide remaining baklava half over ice cream and wrap cake snugly in foil. Freeze cake at least 6 hours and up to 1 week.
  2. Just before serving, cut cake into pieces.


The hazelnut way...
Chocolate-Hazelnut Baklava
Ana Sortun

Ingredients

  • 1 pound hazelnuts
  • 12 ounces bittersweet chocolate, coarsely chopped
  • 2 2/3 cups sugar
  • 1 1/2 tablespoons cinnamon
  • 1 pound phyllo dough
  • 2 sticks unsalted butter, melted
  • 2 cups water
  • 1 1/2 cups honey
Directions

  1. Preheat the oven to 350°. Spread the nuts on a baking sheet and bake for 12 minutes, until the skins are blistered; let cool. Leave the oven on. Transfer the nuts to a kitchen towel and rub off the skins, then transfer to a food processor and pulse until coarsely chopped.
  2. Add the chocolate, 2/3 cup of the sugar and the cinnamon to the food processor and pulse until the chocolate and nuts are finely chopped and the same size.
  3. Unwrap the phyllo and cover with a sheet of plastic wrap. Generously butter a 9-by-13-inch metal baking pan. Butter and stack 8 sheets of phyllo. Trim the edges. Ease the stack into the pan. Sprinkle about 2 cups of the filling over the phyllo. Butter and stack 2 more phyllo sheets; fold them in half crosswise and place over the filling. Sprinkle on another 2 cups of the filling. Top with 2 more buttered, folded sheets and 2 cups of filling. Butter and stack 3 more phyllo sheets, fold them in half and place over the filling. Fold in the overhanging phyllo on top and brush generously with butter. Using a ruler and a sharp knife, cut the baklava (through the top and bottom) into 3-inch squares (there will be a bit left on one long side). Cut each square in half to make triangles.
  4. Bake the baklava for 25 minutes, then lower the oven temperature to 300° and bake for 50 minutes longer, until golden.
  5. In a saucepan, bring the water, honey and the remaining 2 cups of sugar to a boil. Simmer over moderate heat for 10 minutes. Immediately ladle the hot syrup over the hot baklava and let stand until completely cool, at least 4 hours and preferably overnight.

Happy baking! 

Wednesday, January 8, 2014

Winter Fruits Make Sweet Desserts

Happy hump day during the longest week ever! Maybe it's because January 6th is known as the most depressing day of the year or maybe it's because it's my last week in my current job. Who knows? Either way it doesn't stop me from dreaming about delicious desserts (I can't help myself) and today's thoughts have drifted to baking with winter fruit. Usually we top delicate pastries with berries and kiwis and we forget the "harsh" fruits of the bitter cold and dreary months. However, these recipes might just remind you that an apple a day doesn't just keep the doctor away - it also tastes delicious in a cake.

Nadia's Morning Coffee Cake with Winter Fruits
Marcella Hazan

Ingredients
  • 3 eggs
  • 1 1/3 cups sugar
  • 1/8 teaspoon salt
  • 2 tablespoons extra virgin olive oil
  • grated peel of 2 oranges
  • large pear, about 1/2 to 3/4 pound, or 2 smaller ones
  • 1 crisp, juicy apple
  • 1 banana
  • 2 tablespoons freshly squeezed lemon juice
  • 2 3/4 cups flour
  • 2 1/2 teaspoons baking powder
  • 1/2 tablespoon butter for greasing the pan
  • 10-inch springform pan
Directions
  1. Turn on the oven to 375°.
  2. Choose a mixing bowl that can subsequently contain all the ingredients. Put in the eggs and sugar and beat them until they are foamy and form yellow ribbons.
  3. Add the salt, olive oil, and grated orange peel — making sure you haven't grated any of the bitter white pith beneath the orange skin — and mix thoroughly.
  4. Peel all the fruit. Core the pear and apple and cut them into thin 1/2-inch pieces. Slice the banana very thin. Put the fruit into a separate bowl and toss with the lemon juice.
  5. Combine the flour and baking powder and mix them into the beaten eggs, incorporating them thoroughly.
  6. Add the fruit to the bowl with the eggs and flour, mixing well to distribute it evenly.
  7. Smear the bottom and sides of the springform pan with butter, then pour into it the fruit batter. Level off by shaking the pan from side to side; do not press down on the batter.
  8. Bake on the middle level of the preheated oven for 50 to 55 minutes, until the top of the cake becomes colored a light gold.
The finished cake will keep fresh for about 5 days, wrapped with foil and refrigerated.


Cranberry and Orange Pavlovas
Wendy Boys

Ingredients
Meringue
  • 6 large egg whites, at room temperature
  • 1 teaspoon cream of tartar
  • 1/4 teaspoon salt
  • 1 1/4 cups granulated sugar
Topping
  • 2 cups granulated sugar
  • 1 cup water
  • 1 vanilla bean, split and seeds scraped
  • 2 large navel oranges
  • 1 1/2 pounds cranberries (6 cups)
  • 2 cups heavy cream
  • 2 tablespoons confectioners' sugar
  • Mint sprigs, for garnish
Directions
  1. Preheat the oven to 250°. Arrange racks in the lower and middle thirds of the oven. Line 2 large baking sheets with parchment paper.
  2. In the bowl of a standing electric mixer fitted with the whisk, beat the egg whites, cream of tartar and salt at medium speed until soft peaks form. Increase the speed to medium-high and beat in the sugar, 2 tablespoons at a time, until the meringue is stiff and glossy, about 6 minutes.
  3. Using a large spoon, dollop 6 mounds of meringue onto each baking sheet; spread the mounds into 5-inch squares and make an impression in the center of each. Bake the meringues for 1 hour and 45 minutes, until the outsides are firm but the insides are still slightly soft; shift the pans from top to bottom and front to back halfway through baking. Transfer the baking sheets to racks and let the meringues cool completely.
  4. In a large saucepan, combine the granulated sugar and water. Scrape the vanilla seeds onto a small plate and add the pod to the saucepan. Using a vegetable peeler, remove 2 long strips of zest from one of the oranges and add them to the pan. Halve the orange and squeeze the juice into the saucepan. Bring to a simmer, stirring until the sugar is dissolved. Add the cranberries and cook over low heat just until the berries are softened but still intact, about 8 minutes. Let cool completely. Discard the vanilla bean and orange zest and refrigerate until chilled.
  5. Finely grate the zest of the remaining orange and transfer it to a food processor. Using a sharp knife, peel the orange, removing all of the bitter white pith. Working over the food processor, cut in between the membranes to release the orange sections into the food processor. Pulse until chopped.
  6. In a clean bowl, using clean beaters, whip the cream, confectioners' sugar and vanilla seeds until firm. Add the chopped orange and its juice and beat just until combined.
  7. Arrange the meringues on plates and spoon the orange whipped cream into each one. Using a slotted spoon, top with the cranberries. Drizzle with some of the juices, garnish with mint and serve right away.
MAKE AHEAD The cooked cranberries can be refrigerated overnight. The meringues can be made up to 8 hours ahead (on a dry day) and kept at room temperature.

Flour's Famous Banana Bread
Joanne Chang

Ingredients
  • 1 2/3 cups all-purpose flour
  • 1 teaspoon baking soda
  • 1/4 teaspoon ground cinnamon
  • 1/2 teaspoon salt
  • 1 cup plus 2 tablespoons sugar
  • 2 eggs
  • 1/2 cup oil
  • 3 1/2 bananas, very ripe, mashed
  • 2 tablespoons creme fraiche or sour cream
  • 1 teaspoon vanilla extract
  • 2/3 cup walnuts, toasted and chopped
Directions 
  1. Set oven to 350 degrees F. Line the bottom of a loaf pan with parchment paper.
  2. Sift together the flour, baking soda, cinnamon and salt. Beat sugar and eggs with a whisk until light and fluffy, about 10 minutes. Drizzle in oil. Add mashed bananas, creme fraiche, and vanilla. Fold in dry ingredients and nuts. Pour into a lined loaf pan and bake for about 45 minutes to 1 hour.


Happy baking!

Tuesday, January 7, 2014

Peanut Butter in Mysterious Ways

Hello everyone. It's bitter cold in the NYC area, but it's nice and toasty in the kitchen! The other night I made a delicious pasta, which is fabulous hot or cold, that combines peanut butter, soy sauce, and health! What a combo! It kicks up my usual peanut butter pasta about 5 notches. So with that, enjoy (and stay warm, please!).

Aromatic Noodles with Lime Peanut Sauce

Ellie Krieger

Ingredients

  • 3/4 pound spinach linguine or whole-wheat spaghetti
  • 2 cups (about 9 ounces) broccoli florets
  • 2 cups (about 6 ounces) snow peas, trimmed
  • 2 cups (about 6 ounces) sugar snap peas, trimmed
  • 1/2 cup natural creamy peanut butter
  • 1/4 cup low-sodium soy sauce
  • 1/4 cup water
  • 2 tablespoons rice vinegar
  • 2 tablespoons fresh lime juice
  • 1 scallion, cut into pieces
  • 3/4 inch fresh ginger, finely grated
  • 2 tablespoons brown sugar
  • 1/4 teaspoon red pepper flakes
  • 1/2 cup shelled unsalted peanuts


Directions
  1. Cook the pasta in a large pot of water according to the directions on the package. Drain and rinse with cold water. While the pasta is cooking put the broccoli in a steamer basket over a large pot of boiling water and steam it for 3 minutes. Add the snow peas and sugar snap peas and steam for 2 minutes more.
  2. Toast the peanuts in a dry pan over a medium heat until they become fragrant, about 3 minutes. Set them aside to cool. Make the sauce by pureeing the peanut butter, soy sauce, water, vinegar, lime juice, scallion, ginger, sugar and red pepper flakes in a food processor or blender until smooth.
  3. Right before serving, toss the pasta with 3/4 cup of the peanut sauce. Divide into 6 serving bowls and top each serving with the vegetables. Drizzle the remaining sauce over the vegetables. Coarsely chop the peanuts, sprinkle them on top and serve.
Lizzy Bee's Note: I roasted my broccoli with garlic slices in the oven, to the delight of my take-or-leave-greens lovin' husband. 

Monday, January 6, 2014

Post Holiday Pounds

Happy Monday everyone and Happy New Year! After a very hectic holiday season, I am back with more posts! We've had lots of fun baking and cooking and enjoying the holidays in our house and I've got the pictures to show for it (finally!). While you continue to exercise and detox, let's just sit back and enjoy the picture display!

Christmas cookie plate! Rainbows, meringues, Italian ricotta,
pecan shortbread, and madeleines!

Nutella buns for Christmas brunch! YUM.

Ricotta frittata - fun to say and fun to eat with spicy tomato sauce.

Rosemary roasted potatoes

New Year's Eve dinner! Appetizers are octopus salad and calamari.

For the main course: Sweet potato ricotta gnocchi and beef bolognese.

Before midnight - vanilla bean creme brulee and burnt sugar ice cream.
And after the new year, I got to play with my delightful new present - a mandoline. Check out these homemade and healthy apple chips!

Hope your baking was as fun as mine!